Scrollsawing Tips and Tricks


Scrollsawing is a great introduction to woodworking because you don't need a shop full of tools to start. All you need is a scrollsaw, shop vacuum or dust collector, and a sander or two. You can get all that for less than $500. And if you're artistic, you can create your own patterns and won't have to purchase them.
Start with a good saw
Scrollsaws are classified by their throat capacity, the distance between the blade and neck (where the upper and lower arms join together). Most models range from 16–22", so if you want to make big signs or projects, get the biggest saw you can afford.
Nearly all scrollsaws sell as benchtop machines, and although a few come with a stand, I recommend building your own so you can customize it to a comfortable working height. (You might have to make a prototype first or work on sawhorses with risers to find the height you like.) Bolt the saw to the stand to prevent it from scooting.
Source
Magnifying LED work light, no. 57312, Rockler Woodworking and Hardware, 800-279-4441.
I suggest buying a foot-pedal power switch, if one doesn't come with the saw. This allows you to turn the saw on and off while keeping both hands on the workpiece, and your focus on the blade. To help you clearly see your cuts, especially on intricate work, mount an LED magnifying lens (see above).
Choose the right blade, and let it do the work
Scrollsaws take either pin-end or plain-end (pinless) blades, shown below. Some saws accept both types. I prefer plain-end blades because you'll find a larger selection of styles and sizes to choose from, and they require a much smaller entry hole for interior cuts.
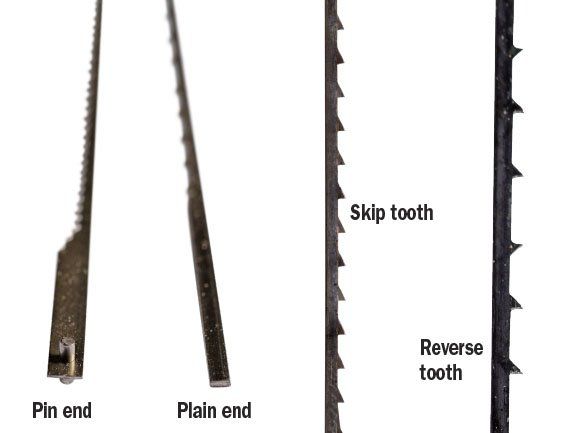
The most commonly used sizes are numbered 1–12, with reverse-tooth or skip-tooth styles, shown above. Both types produce clean cuts with limited tear-out or "fuzz." For thick or dense materials, use a larger blade: numbers 7, 9, and 12 work best for me. These blades allow you to hog out material faster and cut well on straightaways and gentle curves.
With scrollsaw blade sizes, the higher the number, the thicker and wider the blade, generally with fewer teeth per inch.
For thin material, or for cutting a complex design with sharp curves or tight corners, choose smaller blades: I prefer numbers 1, 3, and 5. Sometimes a design requires using several blade types: a larger blade to hog out the majority of the material, and a smaller blade for tight-radius cuts. Buy a variety pack and try different sizes to see which blades work best for your saw and different materials.
Tip! You learn proper blade tensioning with experience. Typically, look for no more than 1⁄8 " of side-to-side deflection. If your blade breaks, you are likely over-tensioning; if it's drifting, bending, or not able to cut to speed, then it's likely under-tensioned.
A new blade cuts quickly, so reduce the saw's speed to help you develop control and accuracy with your cut. As the blade dulls, increase the speed of the saw. Use both hands to guide the workpiece, allowing the blade to do the work. Don't push the workpiece through the cut, but instead use your hands to simply guide and rotate it, allowing the blade to follow the pattern lines. If you have to push the workpiece hard, you are either using the incorrect blade for that material, the blade has reached the end of its life cycle, the saw needs to run faster, or the blade needs more tension.
Add an auxiliary table for intricate work
A zero-clearance auxiliary table prevents small cutoffs from falling through the table. Simply sand smooth a scrap of 1⁄4 " or 1⁄2 " plywood, and drill a hole slightly larger than your blade. To help workpieces glide smoothly, I like to apply a few coats of shellac, sanding between each coat with 400-grit sandpaper. Mount the table to the saw, as shown below.

Easy-on, easy-off patterns
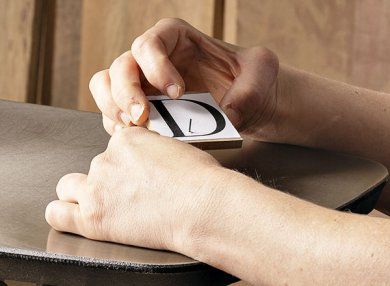
To avoid a sticky mess when adhering a paper pattern to a workpiece, I like to apply contact paper on the workpiece first, and then adhere the pattern, as shown below. This allows for easy removal of both when you finish cutting, with minimal residue on the workpiece.


Start cutouts with small holes
One of the main benefits of a scrollsaw over a bandsaw is that a scrollsaw allows you to cut away voids within a design, such as with fretwork or signs, without an entry/exit cut. To do this, I use a twist bit in a drill press, handheld drill, or pin-vise drill—depending on the size of the hole and workpiece—to drill a hole into the waste portion of an inside cut, below. Drill a hole just large enough to thread your blade through; too large of a hole can result in tear-out.
Pin-vise drill, no. 81D4027, Lee Valley Tools,
800-871-8158.

After drilling all the holes for the pattern, sand the back of the workpiece to remove any splinters and fuzz from around the holes to ensure the workpiece glides smoothly over the table without any catches.
Secure the blade in the lower jaw, thread the blade through a hole (below), then secure it in the upper jaw, and adjust the tension as needed. Cut away that particular inner portion and repeat for each interior cutout.
Begin cuts in the middle
Many designs have very narrow areas or sharp points to cut. Beginning or ending a cut directly at one of these sharp transitions will likely result in fraying or splitting, potentially ruining your project. To avoid this, enter a cut on a straight line within the design, as shown in the photos below.


Stacking does double duty
By stacking and cutting multiple workpieces at the same time, you create precise duplicates, and greatly reduce tear-out. To stack-cut, arrange blanks with the "good side" facing up, and use one of four methods to hold them together:
■ Wrap clear packing or painter's tape tightly around the stack,
■ Drive nails or screws in the waste portions of the design,
■ Use double-faced tape between each layer,
■ Apply hot-melt glue between each workpiece.
When stack-cutting, always saw out interior areas first, then cut the perimeter. This allows the tape or screws to hold all boards together throughout the entire cut.
As your skills develop, you can incorporate several variations of stack-cutting.
■ Stack-cut different thicknesses of same-size stock. Then fit parts together to create different depths within a design.
■ Stack-cut different species of woods together to produce identical cutouts. Then create the look and feel of inlays within box tops or wood art by mixing and matching the different species, as shown below.

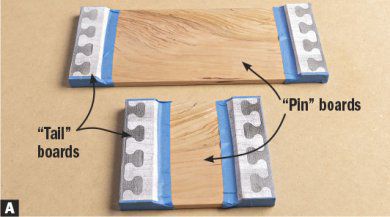
■ Adhere a pattern to a stack of boards and create a unique joinery design, as shown below.
Create an interesting joint with stack-cutting