Show Off Figure with Dye


Starting off
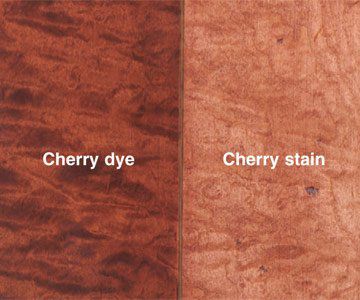
If you've used commonly available, premixed canned stains for years with good success, you may be wondering "Why use dyes? Who needs 'em?" Well, you may. Compared to pigmented stains and pigment/dye mixes—what you typically find on hardware store shelves—dye produces a clearer appearance that shows off the grain much better. The difference really stands out when you dye dense wood that doesn't accept stain well or figured wood, such as curly maple. Stain tends to create a bland look on figured wood, while dye gives the surface an attractive undulating appearance. See the photo above for examples, of coloring curly maple.
Stains and dyes produce different looks because they color wood in different ways. Pure pigment stains only partially penetrate the wood, doing most of their coloring by lodging in tiny surface cracks and pores. If the wood is dense and smooth, like maple, pigment particles find few places to rest. Gel stains are thicker than standard stains and form a film on the surface with very little penetration. They prevent blotchiness but also obscure the grain. Dye, however, dissolves completely in its solvent, goes wherever the solvent can penetrate, and actually changes the color of wood cells. It allows the grain to clearly show through. Some stains contain both dye and pigment, but the combination doesn't solve the problems presented by dense woods.
Consider your dye options
Dyes are sold in liquid and powder form, and every dye is designed to dissolve in one or more types of solvent: water, denatured alcohol, or an oil such as toluol or turpentine. For your first efforts with dye, buy water-soluble powder for ease of use, reliable results, and good resistance to fading.
Dyes are available at woodworking stores, on Web sites, and from mail-order catalogs. We've had good results with powdered dye from W.D. Lockwood & Co., available in 1-ounce packets, depending on the color. Call 866/293-8913 to order, or visit wdlockwood.com.
No matter how you color the wood, the end grain of any wood species presents a uniformity problem because it soaks up more dye or pigment, resulting in a darker color compared to face- and edge-grain surfaces. To produce a more consistent appearance, try one of two methods shown below. Before staining, sand the end grain with a finer grit than used on the rest of the wood, or seal the end grain with premixed shellac thinned 50/50 with denatured alcohol and lightly sand with 220-grit sandpaper after the shellac dries.
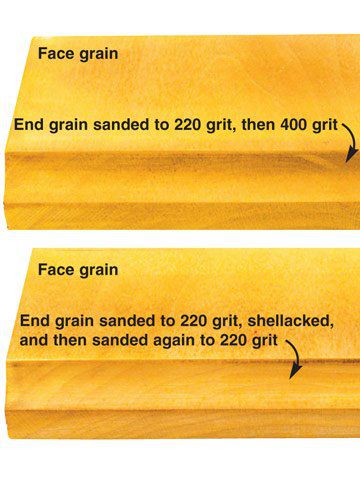

Note: All face grain sanded to 220 grit
Let's apply some dye
Here's how to proceed with water-soluble dye, the type we prefer in most instances. When your project or its parts are ready to finish, sand the wood as usual and then raise the grain by wiping it with a water-dampened cloth. Let the project dry overnight, and then sand lightly with 320-grit sandpaper.This method prevents tiny wood fibers from rising again after you apply the dye.
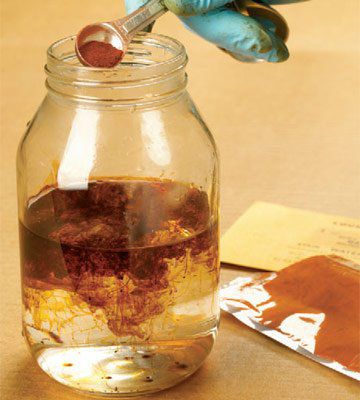
Next, mix dye as shown in the photos at below. Use a glass or plastic container, and prepare more than enough dye to complete the job so you don't apply mismatched tones from two separate batches. Test the result on scrap that matches your project.

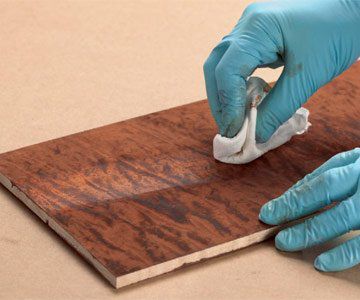
Use a foam brush or a common household sponge to apply water-soluble dye on wood, working in any direction. Flood the surface as quickly and evenly as possible to prevent lap marks and streaks. Also avoid drips on untreated areas. Coat the entire project at the same time. When possible, break large pieces into component parts, or apply dye prior to assembling project parts, to keep your dyeing area at a manageable size. When the surface is covered, wipe it immediately with a soft cloth to remove excess dye as shown below.

Fine-tune the result
If the tone looks darker than you planned, it's best to lighten it immediately. See the basic technique in the photo below.
In extreme cases, when the result is far from what you expected, it's possible to return to the starting point. Lighten the dye with water, and then remove the rest of it from the wood with common household bleach containing chlorine.
If you want to darken the result of your initial dye application, do so with another coat of the same mixture or make a stronger batch and apply that.
Once you become familiar with dyes and the colors they produce, experiment with color adjustment. After dyeing a surface, add a different-color dye to produce a combination of the two. For example, apply red to warm up a cool wood-tone color or add blue to cool down a warm tone.
When the color looks perfect, let the dye dry completely. Drying dulls the appearance of a dyed surface; a clear topcoat restores the color and shine that you saw in the wet dye. Use any topcoat over dye, but be careful if you choose a water-based finish. Brushing water-base over water-soluble dye tends to redissolve the dye and pull it up into the finish, creating a muddy look. Spraying eliminates this problem.
If you decide to try alcohol-soluble dyes, keep these pointers in mind:
- Mix them in denatured alcohol—not rubbing, or isopropyl, alcohol—available at hardware stores and home centers. DO NOT heat this flammable solvent.
- Spray alcohol-soluble dyes to avoid streaking caused by the solvent quickly flashing off. Use a spray gun powered by compressed air or handle small jobs with a unit such as the Preval spray system. Available at home centers, it consists of a 6"-long pressurized sprayer and a detachable glass jar. Order it online by going to dickblick.com.
- To color pine, a notoriously blotchy wood, Steve Mickley recommends mixing alcohol-soluble dye with shellac and spraying this toner mixture on the surface. The tinted shellac forms a film on the wood instead of soaking in.