The Art of Framing Art


There's more to picture framing than cutting clean miters and rabbets. What kind of mats and glass should you use? How do you get everything to fit properly? In this article professional picture framer Stuart Altschuler will share with you the start-to-finish steps and some tips that spell the difference between average and special framed artwork. In no time, you'll be as comfortable showcasing your art as making the frame parts.
Take the "blink test"
First, think in terms of presenting the art, not simply framing it. Good framing design passes what I call the "blink test." Stand in front of a framed piece of artwork on a wall and close your eyes. When you blink them open, your eyes should focus first on the artwork, not the mat or the frame. Over the years, I have developed a set of guidelines that will help your framed artwork pass the blink test:
■ Go conservative, not flashy, with the style of the frame and color of the mat. Make the artwork stand out as the most important element.
■ Match the style of the frame to the style of the artwork. Use fun frames for fun artwork or photos and formal frames for serious pieces.
■ Keep the wooden frame parts narrower than the mat margins. It helps keep everything in proportion.
■Choose a mat board colorthat won't compete with your artwork. Use a neutral color, such as white or off-white, to blend with the artwork.
Also, if you want to stack two mats to create an accent, use white or another neutral color for the front mat and a brighter accent color for the back mat [Photo A, below]. For example, if you are framing a photograph of a sailboat with a red stripe in the sail, use a cool off-white as your top mat to complement the cool tone of the blue water. Then add a red lower mat to match the stripe in the sail.


To use the "Figuring Your Mat and Frame Sizes" chart, below, first
plug these measurements into the column on the right:
Width of your unmatted artwork = A
Height of your unmatted artwork = B
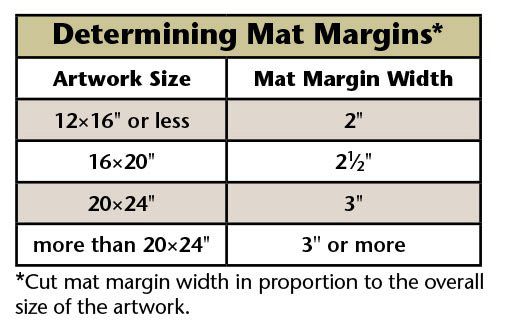
Width of your mat margins (from the "Determining Mat Margins" chart) = E
Width of rabbet in frame stock = H
Width of the frame stock = I
Then perform the calculations in the middle column and write the results in
the right column. (Note: The gray boxes show examples of calculations.)