Tuning up your portable planer


Compared to the versatility of the tablesaw and jointer, the planer is a one-trick pony. Its only purpose in life is to machine opposite faces of stock parallel with each other and to a desired thickness. Of course, even a pony has to learn its one trick well before you put it through its paces—and the same goes for a planer.
Planers come in many sizes and shapes, but all of them share similar components that need tuning from time to time. We will cover the basic adjustments here. Since your machine may vary somewhat from those shown in our illustrations, you may have to spend time getting familiar with the locations of its adjustment points. Your ownerʼs manual should help, if you have one.
The four steps to planer-adjustment success
For a planer to do its job properly, the table must be parallel with the cutterhead knives along their length, the feed rollers must press the stock firmly against the table, and the knives must be set to exactly the same height. Hereʼs how to get everything in sync.
1 Align the table with the cutterhead
Begin by unplugging your planer and cleaning any rust or debris from its table. (Lower the table or raise the head assembly so you can get your hands in there.)
If your machine has bed rollers, adjust these first. Lay a straightedge on the rollers, and use a feeler gauge to check how far they stick above the table. This distance should measure .002" for most planing work. If you work with rough-cut stock, and find that it doesnʼt feed smoothly, adjust the rollers as high as .010" above the table. If the rollers need adjusting, check your ownerʼs manual to learn how to do it. With some planers, you make the adjustment with shims. And with others you change the rollersʼ elevations with screws, as shown below.
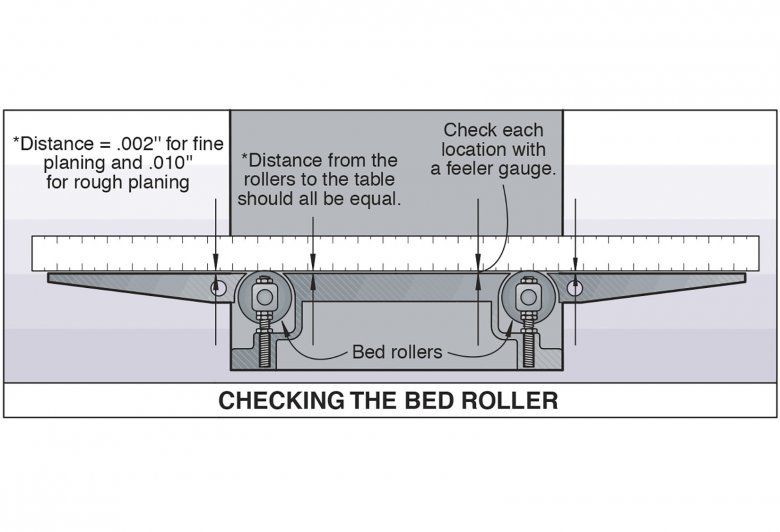
After youʼve adjusted the bed rollers, if any, find out if the table is parallel with the cutterhead. To produce stock that is the same thickness across its width, the table and cutterhead must be within .005" of parallel.
The simplest way to do this is to insert a piece of stock on edge between the table and one end of the cutterhead, as shown below. Then, adjust the elevation until the cutterhead just touches the stock. Slide the stock along the table and under the cutterhead to the other end of the cutterhead. If the table is parallel to the cutterhead, the stock will not jam into the cutterhead or separate from it, showing daylight as you move it.

If the table isnʼt parallel, again check your ownerʼs manual. Most planers have two or four table- or head-elevation screws that pass
through the table or head, as shown in the opening photo and in the drawing below. These interconnect with gears or chains so they all turn in unison. To adjust this style of table or head, disconnect the screws from each other either by loosening setscrews that hold the gears to the screws, or by removing the chain that runs around sprockets under the table.

Now, individually turn the screws until your piece of stock contacts both ends of the cutterhead without binding. Then, retighten the setscrews or reinstall the chain.
(With some portable planers, like the Delta above, you adjust the head, not the table. You loosen a pair of nuts and turn bushings that raise or lower the head, then retighten the nuts. We removed the side covers of this machine to reveal its inner workings.)
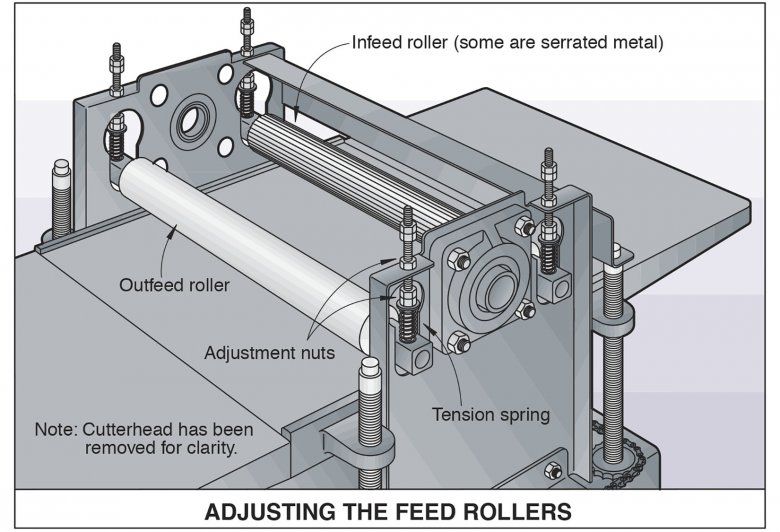
2 Adjust the feed rollers
Feed rollers, made of rubber or serrated metal, run the stock between the cutterhead and the table at a consistent rate. If your planer leaves marks on the wood, feeds erratically, or stalls, the rollers may be exerting too much pressure. Too little roller pressure, or rollers coated with pitch and gum, contributes to a jerky feed rate—and also can cause kickbacks.
Most planer rollers are spring-loaded, like the ones above, so they can follow uneven stock. If you suspect that your machineʼs rollers are applying too much or too little pressure, check your ownerʼs manual to learn how to adjust their springs. Adjustment systems vary from manufacturer to manufacturer.
Clean off dirty metal rollers with solvent and a wire brush. Wipe rubber rollers with a rag dampened in mineral spirits. Go lightly. Too much solvent can damage rubber rollers.
3 Set the knives
A planer canʼt produce smooth, ripple-free surfaces unless its knives are razor sharp and set a uniform distance above the cutterhead. As with jointers, a planerʼs knives are held in place by gibs and are raised and lowered in most cases with springs or jackscrews. You can adjust them with the basic knife-setting gauge that may have come with your machine, or with a dial indicator knife-setting gauge.
Begin by loosening and removing the knives. Clean the gibs and slots in the cutterhead with solvent to remove any wood residue. Reinstall a sharpened knife in each slot, but tighten its gibs or jackscrews only part way; you should be able to move the knives with slight pressure.
(Some portable planers have fixed-position knives that you donʼt have to adjust. You simply bolt new knives into holders that automatically locate the knife at the proper height.)
The basic knife-setting gauge works well for setting the knives in a planer because the knives must be set parallel to the head. Set the gauge over a knife at each gib bolt, as shown in the drawing below. A small boss on the gauge contacts the edge of the knife and helps prevent the knife from creeping upward. Tighten the gib bolts in increments, starting with the outside bolts and moving toward the center.

If a knife creeps up slightly as you tighten it, tap it back into place with a block of hardwood. If a knife is a little low, lift it with the jackscrews.
A dial indicator knife-setting gauge works in much the same way as the basic gauge, but it shows you exactly how well you set the knives. Attempting to set all three knives to the exact same height may take an hour or more. So, consider the job well done if you come to within .001". As with a jointer, donʼt overtighten the knife bolts.
4 Reset the depth gauge
Now, give everything a final once-over, including a quick spin of the head by hand to make sure the knives donʼt collide with other parts. Finally, plug in the machine, turn it on, run a piece of stock through it, measure the stockʼs thickness, and use this dimension to reset the planerʼs built-in depth gauge.