Two-saw Tuneup


Whenever I look at my tablesaw and bandsaw, I think of that old Timex commercial that went, "Takes a licking and keeps on ticking." But even as dependable as that old Timex was, it would still lose a few seconds over time and would have to be reset. Such is the case with my stalwart tablesaw and bandsaw. Fortunately, the tune-up process doesn't take much time and returns their dead-on accuracy.
First, tune up the tablesaw
My tablesaw is a cabinet-style saw, but the steps to tuning it up are much the same for a contractor-style saw.
First, crank the blade arbor to full height, then inspect and clean the faces of the arbor flange and the blade washer. This ensures that the blade seats well when reinstalled, below.


With the arbor raised, you can see the blade height and tilt worm gears and mating gear teeth. These should be cleaned of all sawdust and old grease using a wire brush, compressed air, and, if necessary, a degreasing spray. I prefer using Gunk brand carburetor and choke spray cleaner; it works well to remove grease and varnish from metal parts.


When the parts are clean and dry, apply a dry-spray lubricant to the worm gears, teeth, and the trunnion (the mechanism that holds the arbor and blade) pivot points. For this, I prefer WD-40 Dirt & Dust Resistant Dry Lube spray. Last, apply penetrating lubricant to the hand-wheel shaft points and bearings, below. Standard WD-40 works well for this.

Check the belts next. Replace cracked pulleys and frayed belts. While you're there, a good blast of compressed air into the motor will clear dust that can keep the motor from running cool. Now it's on to the top of the table.
To check for flatness, place a long straightedge across the width of the table and any extensions. Inserting thin brass shim stock (available in assortment packs online) at a couple of points between the extension and the table can change the "pitch" of that extension. Shims at the top of the joint lower the outside end of the extension; shims at the bottom of the joint raise the end. Tighten all connecting bolts and nuts. Then use that straightedge to ensure the saw's throat plate rests flush with the tabletop, below. Most throat plates have screws for adjusting the plate up or down. A plate without these screws can be shimmed with pieces of painter's tape.

After reinstalling the blade, raise it fully and tilt it to its 90° stop. Confirm an exact 90° using a quality square, touching the blade body and the tabletop. Adjustments to the stop are done under the table. Find the stop's location below in the owner's manual. Use the same process to check the 45° setting of the blade and adjust its stop as necessary.

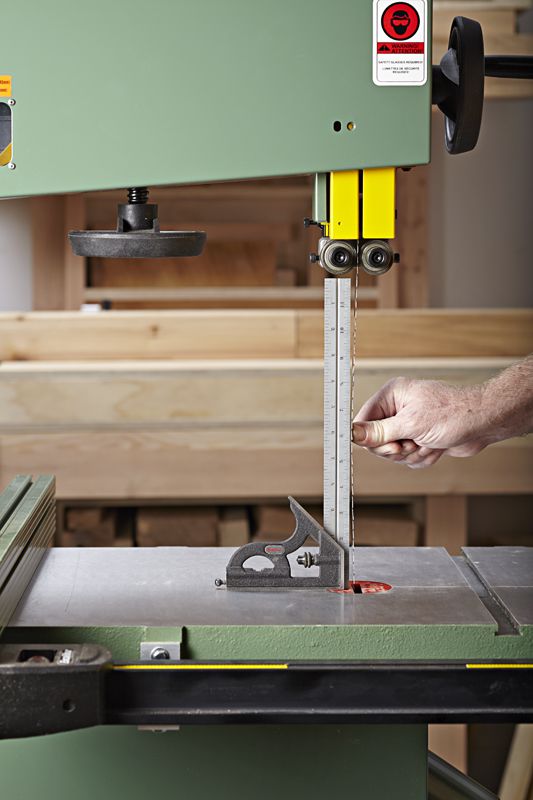
The last check of the blade is to assure that it is parallel with the table's miter-gauge slot. Place a combination square in the saw's left miter-gauge slot, resting against the right edge of the slot. Slide the rule to just touch a tooth at the front of the blade. Rotate the blade, moving the same tooth to the back of the table and use the square to check the distance there [photos below].


To fix a gap or binding, the process is different based on the type of saw: On a cabinet saw, slightly loosen three of the four bolts that hold the top to the base and pivot the top slightly. Then, retighten the bolts. On a contractor-style saw, the bolts are inside the saw underneath the top and a bit more difficult to reach. There, you'll be moving the trunnion instead of the table to adjust the blade parallel to the miter slot.
Now, in a similar fashion, use the right miter slot to align the fence, below. Each fence has a different method of adjusting its alignment, and the manual will show you how.

Because the miter slot is used as a reference to align the blade and the fence, it makes sense to use it to align the miter gauge, too. A drafting triangle placed along the edge of the right slot will accurately square the face of the miter gauge, below. Once set, lock the miter gauge's cursor (and stop, if any) at 0°.

Last, it's important to check the alignment of the splitter or riving knife. A properly placed splitter will all but eliminate any chance of a dangerous kickback. Whether it's part of the blade guard or an aftermarket stand-alone, the splitter must sit directly behind the blade and not extend beyond the edges of the blade. One of the simplest ways to check this is to lay two straight boards on either side of the blade and set the splitter evenly between them, below. Recheck this alignment whenever the splitter is removed and reinstalled.

Finish up the tablesaw tune-up with a thorough cleaning of the tabletop and a coat or two of a non-silicone wax. This will inhibit rust formation while reducing the drag you feel when pushing stock across the table.