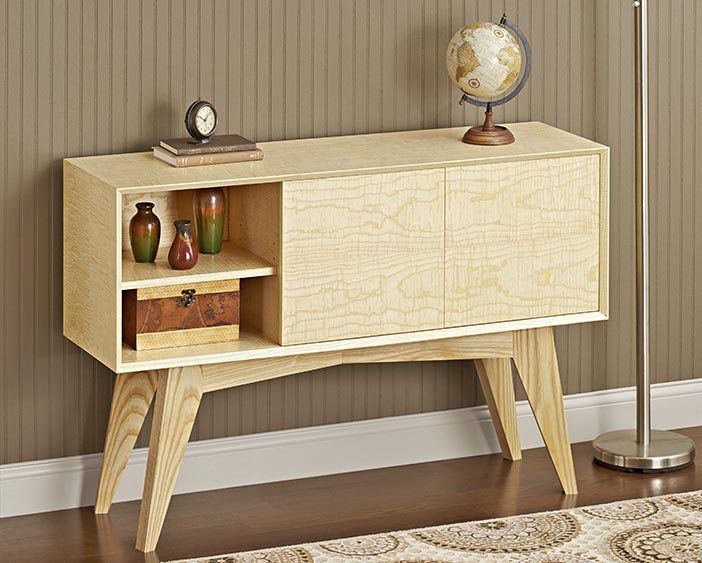
Vacuum-Bag Veneering


Working with veneer is simpler than you might think, provided you clamp it down using a vacuum press. To walk you through the process, we turned to professional furnituremaker Matt Seiler, right, who often uses veneer in his work (mswoodcraft.com).
Matt says working with veneer provides several benefits: "It allows you to change grain direction on your dress face, and even mix species on the same or different faces in ways that would be difficult or out of the question with solid wood. Find veneer at a hardwoods or woodworking store, or online, in hundreds of species. The color and grain palette is as wide as your imagination and ever-changing."
How vacuum systems work
A vacuum bag distributes considerable force across large areas—even concave or convex surfaces—that can be impractical or impossible to press with typical clamping methods. By removing air from inside a sealed bag, the weight of the air outside presses on the bag and its contents. If that sounds like a weak clamp, consider this: A 24×36" panel inside a vacuum bag has over 12,000 pounds pressing on it at sea level (10,500 pounds at 5,000' elevation).
The photo below shows the items in a typical vacuum-pressing system.
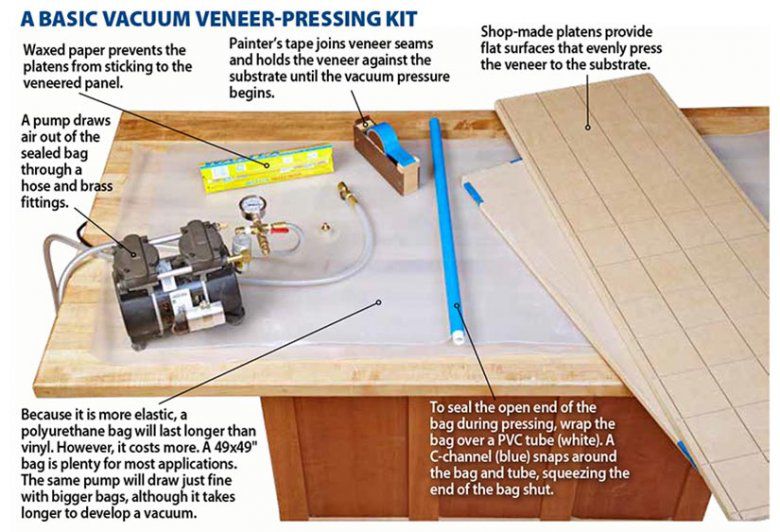
Kits with a pump, hose and fittings, and a 20-mil vinyl bag to accept panels up to 49×49" start at about $400. (Applying veneer to the 8'-long panel for the credenza (shown below) required a 49×97" bag. A 20-mil vinyl bag of this size would add about $75 to the kit cost; upsizing a 30-mil polyurethane bag would add about $215.)

Although the vacuum bag applies plenty of pressure, without some help it may conform to bubbles in the veneer instead of flattening them. Matt sandwiches the panel between two platens to distribute that pressure evenly.
Make platens from 3⁄4 "-thick melamine-coated particleboard or MDF, sizing them at least 1" larger than your panel. Ease the edges and corners with 1⁄4 " round-overs so they don't damage or puncture the bag. On one of the platens, cut a grid of 1⁄8 "-deep kerfs spaced about 4" apart. These help prevent trapped air by providing an escape route out of the bag during pressing.
Adhere to this no-contact order
Contact cement may be the adhesive of choice when working with plastic laminates, but Matt warns against it for wood-on-wood bonds: "Under veneer, contact cement dries out, and edges and corners will easily pull up and break off."

Choose a substrate and glue
Veneer needs a smooth surface, called a substrate, to support it. MDF makes an excellent substrate for panels such as doors, drawer fronts, and tabletops. For panels where you'll need to mill joinery, choose maple or birch plywood. But Matt says to avoid oak plywood: "The pronounced grain pattern will telegraph through your veneer after pressing."
Because you'll trim the panel to final size after veneering, make the substrate, including any solid-wood edging, 1⁄2 " longer and wider than your panel's finished dimensions. Make edging at least 1" wide to allow enough material to trim away, and for any edge profile.
If you cover a panel smaller than 24×24" with a single piece of veneer, yellow woodworking glue works well. For larger panels, or those with seams, Matt uses a one-part cold-press veneer glue [Supplies on Demand, below], "because its longer open time provides more time to work, and its thicker viscosity reduces squeeze-out through the seams." Some manufacturers offer light-, medium-, and dark-colored varieties that help any glue line blend better with the veneer.
Cut the veneer
To slice veneer, Matt uses three simple tools: a sharp utility knife for crosscuts; a veneer saw for ripcuts; and a straightedge, such as a metal ruler, to guide them [Photos A, B].
Quick Tip! Apply a strip of 150-grit self-adhesive sandpaper on the bottom face of your straightedge to keep it from shifting during cuts.

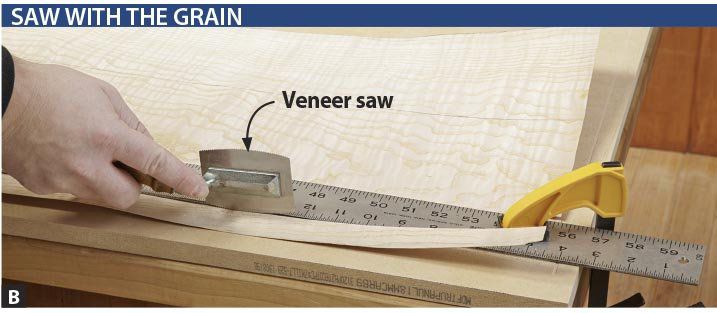
Place a sheet of veneer on a scrap piece of MDF to prevent marring your bench when cutting. Clamp your straightedge atop the veneer to secure both in place. For best results, take several long, light passes along the cutline.
Getting a sheet of veneer large enough to cover your substrate may require joining smaller sections of veneer. To do this, place the pieces next to one another on your bench, good face down with the cut edges touching. Align the two pieces to achieve a pleasing grain pattern across the joint line; then, use short sections of painter's tape to close the seam temporarily [Photo C].

Flip the veneer sheet over and lay a single piece of tape along the full length of the seam on the front face [Photo D]. This continuous strip keeps glue from squeezing out through the seam, reducing cleanup when the panel comes out of the bag. Flip the sheet again and remove the short pieces of tape.
Quick Tip! Don't overlap layers of tape or allow wrinkles in the tape. These create dents in the veneer during pressing.

Cover your backside, too
As glue dries from the outer edges of the veneered panel inward, the difference between the drying edges and still-moist middle creates tension that can bow even a 3⁄4 "-thick substrate. Applying veneer to both faces of the panel balances the tension, keeping the panel flat. Matt says, "The backer veneer doesn't have to be anything special (you can buy inexpensive backing veneer for just this purpose), but it must be attached at the same time as the front, using the same type of glue."
Time for more pressing issues
Orient your veneer sheets as you want them to lie on the panel. Tape waxed paper to the faces of the platens that will contact the veneer, using just enough tape on the edges to hold the waxed paper in place. Apply glue to the back face of the substrate—not to the veneer [Photo E]. Applying adhesive to the veneer makes it curl up and become unmanageable. Use a putty knife to scoop up any pooled glue as it will not spread out beneath the veneer.
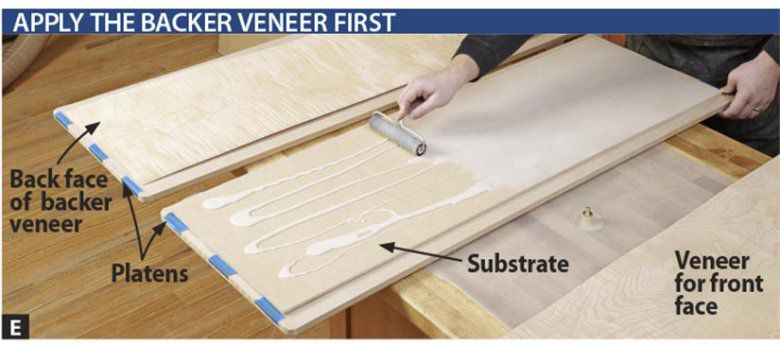
Apply and position the backer veneer. It may begin to curl up at the edges as it absorbs moisture from the glue. To prevent this, Matt secures these areas with short strips of painter's tape. Then, flip the panel over onto a platen and repeat this process on the front side.
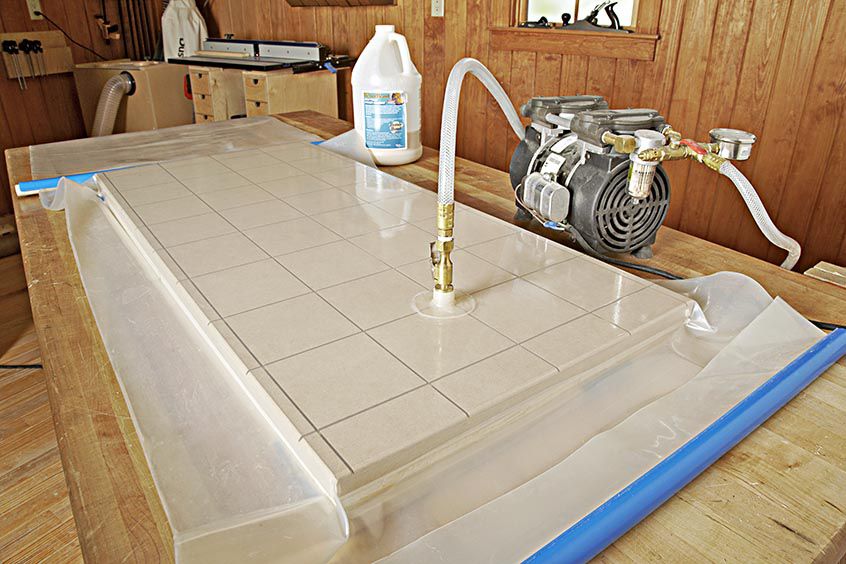
Place the gridded platen on top of the panel, then slide the entire "sandwich" into the vacuum bag [Photo F]. Smooth any wrinkles from the bag, close and seal it, and turn on the pump. "All bags leak slightly," Matt says, "so to maintain pressure, leave the pump on while the glue dries."

After one hour, switch off the pump and remove the materials from the bag. To prevent glue squeeze-out from adhering the painter's tape to the veneer, gently remove the tape [Photo G]. Return the panel and platens to the vacuum bag, restart the pump, and allow at least three more hours of clamping.

Finish up the panel
After the glue dries, clean up one edge with a freshly sharpened chisel or utility knife [Photo H]. Then, trim the panel to final size at the tablesaw [Photo I].


You can quickly and easily order a brayer, veneer saw, cold-press glue, and utility knife with blades. Simply delete any supplies you already have on hand before checkout.
Nearly invisible repairs for veneer
Don't panic if you chip out part of an edge or a corner of the veneer when trimming it flush with the panel, or when cutting the panel to size. "It happens," Matt says. "The repair is easier than you think."
First, find an area in a piece of leftover veneer that matches the grain and figure of the damaged area. The closer the match, the better the patch will disappear. Cut the patch oversize, with edges that run along and/or diagonal to the grain [Photo J]. Joint lines running perpendicular to the grain are difficult to hide.

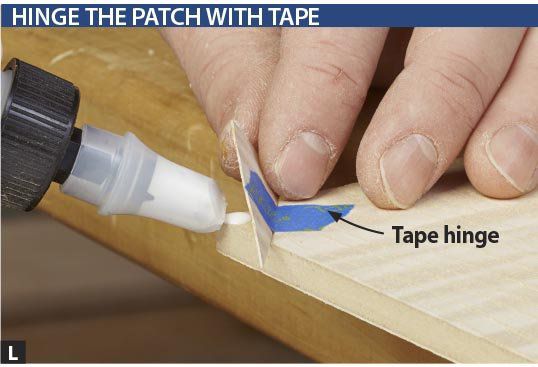
Position the patch, and score along its edge with a chisel. Then, work from the edges of the panel toward the score mark to lift off the damaged veneer [Photo K].

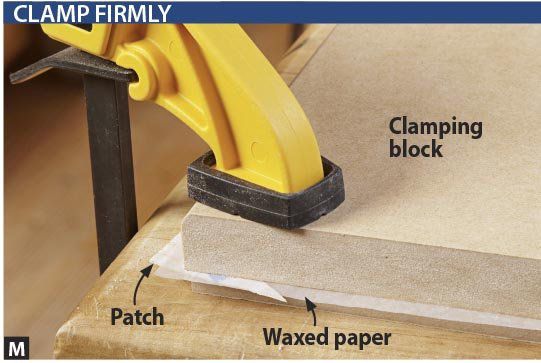
Reposition the patch where you want it, and tape it in place temporarily. A small piece of tape allows you to see the veneer and check the grain match. Once you're satisfied with the placement, lift the patch, apply glue [Photo L], and clamp the repair [Photo M], leaving the clamp in place for at least a couple of hours. After sanding, the patch will almost disappear [Photo N].