Veneering small panels


Occasionally, when building a project with frame-and-panel components, you'll need a couple of special plywood panels. Maybe it's a panel of a common species, but with two good faces (not typical in plywood), or one with an exotic or figured face veneer. (Try to find a sheet of 1⁄4 " curly maple plywood at your local home center!) These panels usually are small enough that you can apply the custom veneer yourself. Here's how.
Choosing your veneer
When buying veneer you'll have plenty of options to choose from. They include:
Paper-backed veneers:
* Available with or without adhesive.
* Adhesives are pressure- or heat-sensitive.
* Backed veneers with adhesives come in the most limited choice of species.
Unbacked veneers:
* Thicknesses varies from 1⁄40 " to 1⁄16 ".
* Available in the widest choice of species.
The curly maple veneer used on the slant-front secretary's panels comes unbacked only. We chose the 1⁄16 "-thick veneer for several reasons. Substantially thicker than the 1⁄32 "- to 1⁄40 "-thickness of standard solid-wood veneer, 1⁄16 " veneer is less fragile, and you're not likely to accidentally sand through it. And because its thickness resists wrinkling, you won't need to flatten it before use.
Buying Guide
The following retailers carry a wide variety of veneers, including 1⁄16 "-thick veneer: Certainly Wood, phone 716/655-0206; and Bob Morgan Woodworking Supplies, Inc.
On to more pressing matters
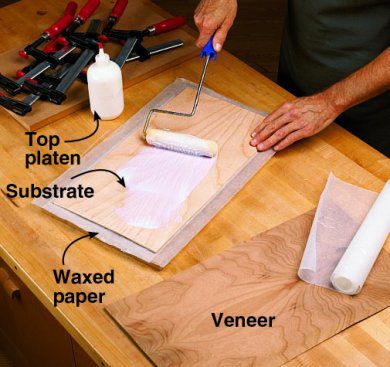
Applying veneer to a plywood panel is simple, and you probably have most of what you need lying around your shop. First, cut two 3⁄4 "-thick platens (the flat plates you'll sandwich the veneer and plywood substrate between) about 1" larger in length and width than the panel you're veneering. Because they're smooth, flat, and inexpensive, particleboard or medium-density fiberboard (MDF) make good platen material.
Place waxed paper on the bottom platen, and then the plywood substrate. Spread an even coat of white woodworking glue (for longer open time) on the substrate, as shown, below. Add the veneer and more waxed paper. Finally, add the top platen and clamp the sandwich together. Let the glue dry for 24 hours.

For panels up to 12" wide, platens and clamps are all you need for even clamping pressure, as shown below. But for panels more than 12" wide, you'll need to add top and bottom crossbearers to apply adequate clamping pressure at the panel's center.

To make bottom crossbearers, cut lengths of 2×4, and joint one edge. (We cut our crossbearers 28" long for pressing panels up to 24" wide.) Then rip them to a uniform width so their tops will be in the same plane when they are lined up on your workbench. (We ripped ours 31⁄4 " wide.) Next, cut notches in the ends for your clamp heads, where shown on the drawing, below.


In order for the top crossbearers to apply pressure at the center of the platen, you'll taper them from their centers to their ends. Then, with the tapers down, clamping pressure at the crossbearers' ends causes them to bend, pushing down at their centers. To make the top crossbearers, joint one edge of the lengths of 2×4, and then rip them into two 15⁄8 "-wide pieces. Mark 1⁄8 " tapers from the center to each end of the crossbearers, where shown in the drawing above. Hand-plane, belt-sand, or joint the tapers, and then round the points at the centers with a sanding block. Mark the opposite edges with the word "UP."
To veneer a panel using crossbearers, line up the bottom crossbearers on your bench, spaced as shown below. Then stack on the platens, waxed paper, glued substrate, and veneer in the order shown on the drawing above. Position the top crossbearers with the "up" edges up, and apply the clamps, tightening them just enough to hold them in place. With all the clamps in position, work your way up and down the panel's length, tightening each pair of clamps equally. When the crossbearers squeeze the platens at the edges, you'll have even pressure applied to your glue-up across its entire width.
