What a pyramid-point tool can do for you


The pyramid-point tool has been in English turners' toolboxes for generations, and was typically shop-made from a triangular file. We found one made from 1⁄2 " round high-speed steel in the Craft Supplies USA catalog, where it claimed, "…the three-sided pyramid point tool is excellent for turning perfect beads and spheres…. It is not a scraping tool but is used for shearing or planing surfaces, much as a skew is used. However, the pyramid-point tool is more forgiving and doesn't produce the catches of a skew." Needless to say, that last part piqued our interest.
To test the claims, we sent the tool to professional turner and WOOD® magazine consultant Phil Brennion of Chino Valley, Arizona, for his evaluation. We asked Phil to answer the following four questions, trying the tool out turning willow, box elder, and ash, here's what he discovered.
What's it good for?
The pyramid-point tool performs many of the same functions as a skew chisel, but with minimal potential for the nasty kickback often associated with a skew. As easy to use as a scraper, it cuts with a shearing action to produce beads and spheres with much less demand for advanced technique. You easily can accomplish sharp detail, especially where you find a gradual transition into the detail. But because of the tool's 30° pyramid tip, it cannot form deep, narrow cuts. The tool is great for forming tenons, and although you can make planing cuts and tapers with it, the bevels' short edges make it difficult to get smooth surfaces on long cuts.
How do I use it?
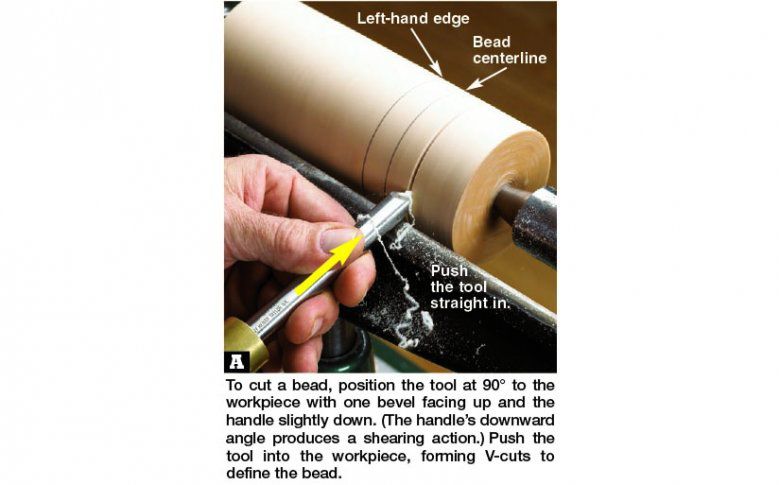
Unlike a skew chisel, you'll immediately be comfortable with the pyramid-point tool. It takes a little time to develop the technique required to use it to its fullest potential, but even a novice can soon turn beads and other convex surfaces with few problems. As you use the tool, you'll discover more things you can do with it, and more than one way to make the same cuts. When using the pyramid-point tool, position the tool rest about 1⁄2 " below the center of your workpiece so the tool cuts at or above center. To form a bead, first mark the center and both sides of the bead with a pencil. Make V-grooves to define the bead, as shown in Photo A, below.
Beading cuts, planing and end-grain cuts
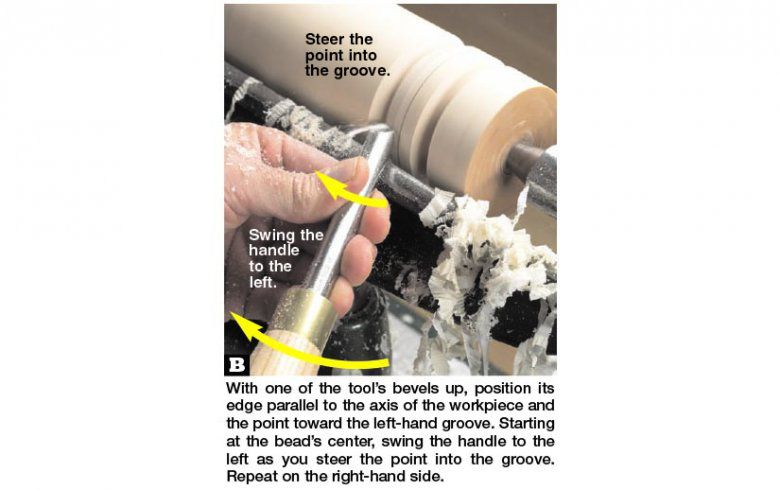
Rough out the bead, as shown in Photo B, below. Cutting downhill from the bead's center to the groove removes stock quickly, and avoids pulling chips out of the grain.
To finish the bead, start with the tool in the groove, and cut uphill from the groove to the bead's center, as shown in Photo C, below. This gives you ultimate control for smoothing your beads. With most of the waste already removed, chipping is eliminated.

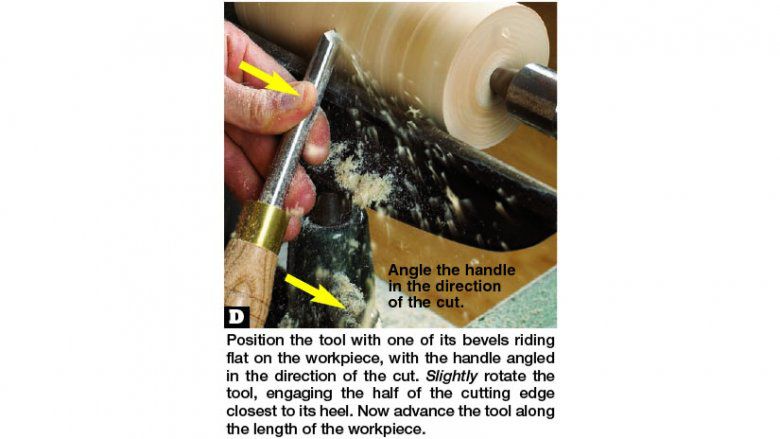
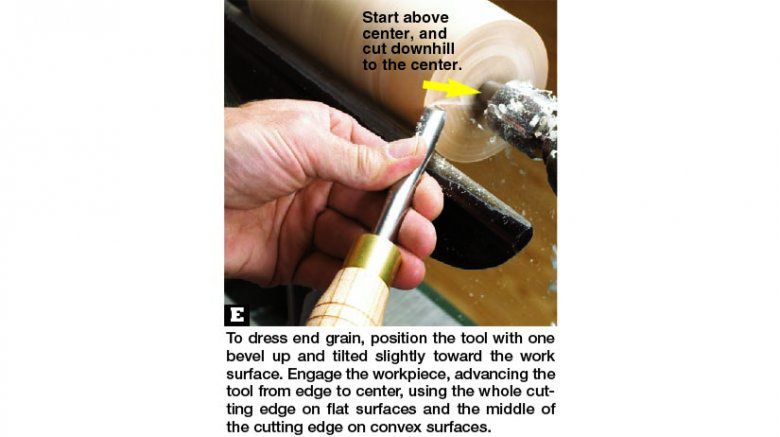
Make planing cuts on cylinders or long tapers using the half of the cutting edge closest to its heel, as shown in Photo D, below. Finally, dress end grain, as shown in Photo E, following.
As one cutting edge dulls, simply rotate the tool to the next one. With this tool, you have three edges to dull before resharpening.
How do I sharpen it?
For surface quality close to that produced by a skew chisel, you'll need to keep this tool sharp. To sharpen the tool, lay it on a platform-type tool rest, adjusting its angle so the bevel makes full contact with the grinding wheel. Switch on the grinder, and lightly touch the bevel to the wheel, checking to make sure its entire surface is ground. Pay close attention to keeping the bevel straight when contacting the wheel, and avoid any rolling motion. Rotate the tool to the next bevel and repeat, keeping the point centered on the tool. To grind bevels exactly 120° apart, see the Shop Tip, below.
Should I buy one?
The pyramid-point tool's great attraction is its ability to make cuts normally reserved for a skew chisel, such as forming beads and spheres, with very little potential for the catches and spiraling digs associated with a skew. The tool's rather short, three-bevel tip allows for fairly aggressive removal of wood from your workpiece. Although not capable of deep detail, it performs most jobs well, and with a little practice, leaves clean, smooth surfaces. While not likely to make you throw away your skew chisel, the pyramid-point tool just might make it collect dust, rather than make it.
Buying Guide
USA, 800/551-8876, or go to www.woodturnerscatalog.com.
Shop Tip
Make this simple grinding guide for foolproof sharpening
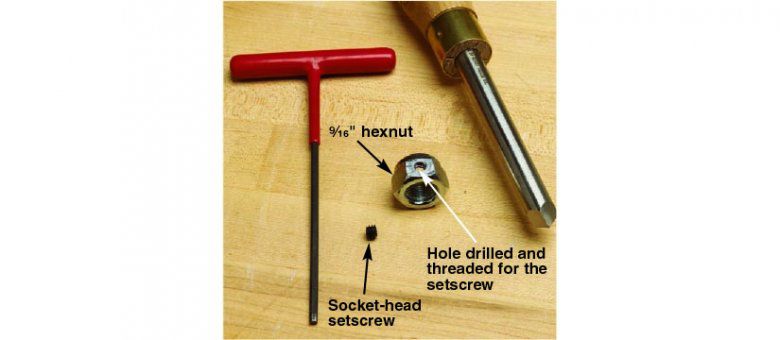
Although the sharpening geometry of the pyramid point tool is simple (three 30° bevels on the end of a round bar), keeping the tool steady while grinding and the bevels even is a challenge. Here's a simple hardware-store solution from Dave Collier of Nashville, Tennessee.
Buy a hex nut that fits closely over the tool's shaft, and a socket-head setscrew. (We found a 9⁄16 " hexagonal lock nut and a 1⁄4 -20 setscrew 3⁄16 " long in our local hardware store's specialty fasteners aisle.) Drill a hole centered on one of the nut's faces, and tap threads for the setscrew. (See photo, above.)
Thread the setscrew into the nut, and slip the nut over the tool shaft. Align one of the nut's faces with one of the tool's bevels, and tighten the setscrew with an Allen wrench. Lay the tool on your grinder's platform rest with one hex-nut face on the rest and one bevel on the grinding wheel. Adjust the platform's angle so the tool's bevel rests flat against the wheel, as shown in the photo, below. Switch on the grinder, and lightly touch the bevel to the wheel, moving it side-to-side by pivoting the tool on the nut. When the bevel is ground toe to heel, rotate the tool to its next bevel, and repeat.
