Wood Joint Torture Test 2 Doors & Drawers


A year ago, we brutally tested various dado, rabbet, mortise-and-tenon, butt, and miter joints to learn which were strongest. Now, to uncover the toughest common door and drawer joints, we made dozens of test samples and pushed them to their breaking point—literally.
For door joints, we made six samples each of cope-and-stick, stub-tenon-and-groove, half-lap, and haunched-tenon joints. Then we made test samples of lock-rabbet, box, through-dovetail, half-blind dovetail, lock-miter, sliding-dovetail, shouldered-dado, and rabbeted drawer joints. All were built using lumber of similar density and the same yellow glue for consistency. Door-joint samples used 3⁄4 ×2" red oak and, except where noted, the drawer box samples were built from 1⁄2 ×4" poplar.
Using testing equipment at Iowa State University, we tore apart each joint one of two ways. The first measured a joint's resistance to being pulled apart, as when yanking open a drawer or pulling a sliding frame-and-panel door sideways. The other, a shear test, measured a joint's ability to withstand being pushed out of square until its glue joint failed. (Picture a child hanging from an open cabinet door, or a wide dresser drawer binding as it's yanked open.)
When the cracking and tearing were over, we discovered that all of the joints withstood far more of the pull-apart force they'd encounter regularly than shearing force, which is uncommon. For example, the average drawer joint held up to 1,489 lbs of pull-apart force versus only 80 lbs of shearing force. The average door joint withstood 1,214 lbs of pull-apart force but only 511 lbs of shearing force. To see how the joints in each category compared with each other, check the charts below.
After analyzing piles of shattered joints, we learned a few things that you can apply in your own shop to make stronger joints.

DOOR JOINTS
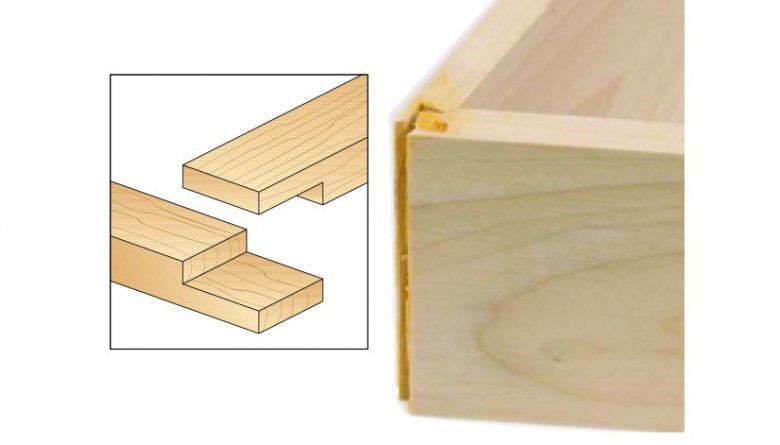
#1 Half-lap
■ FINDING: In shear-strength tests, half-lap joints withstood more than twice the force of the next strongest joint. LESSON: A large face-to-face glue area gives this joint its incredible strength. Choose it for mirror frames or heavy doors likely to endure abuse.
■ FINDING: In pull-apart tests, more than half of the glue joint survived even as the stile piece split. LESSON: Here's a joint that can support weighty inserts such as stained-glass.
■ FINDING: Where the glue bond did break in shear tests, we could see dado-blade score marks. LESSON: Sand laps smooth for a stronger glue bond.
■ FINDING: Despite being a basic, easy-to-make joint, half-laps outlasted the more elaborate alternatives such as cope-and-stick joints. LESSON: More work won't result in more strength.
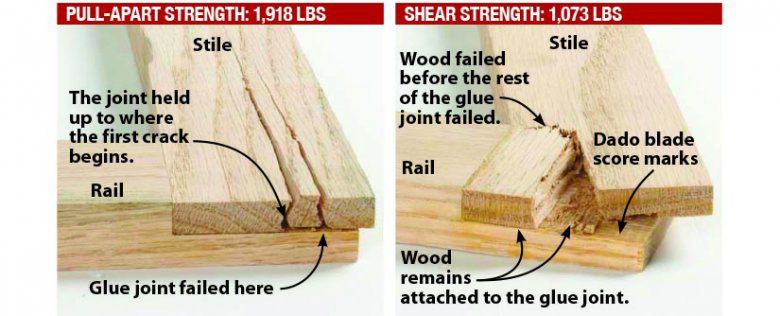
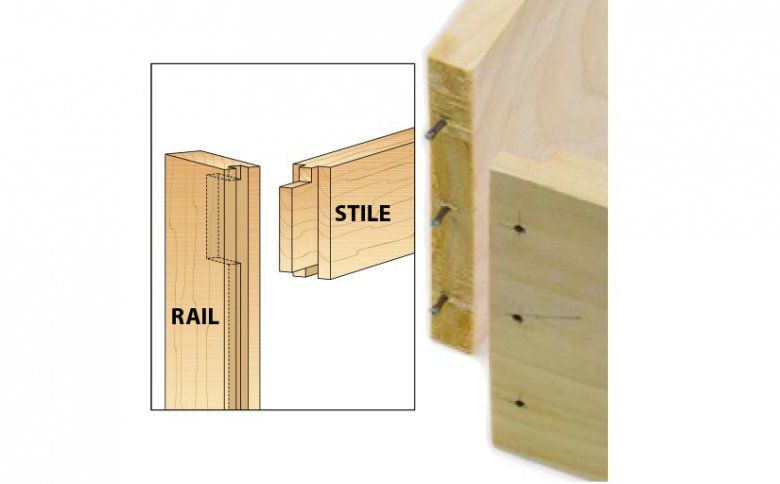
#2 Mortise-and-haunched-tenon
■ FINDING: On each pull-apart test, the mortised stile split along its length before the joint cracked at the tenon shoulders. LESSON: The tenon's face-grain-to-face-grain glue bond adds strength, but less than a half-lap.
■ FINDING: In pull-apart tests, the stile of each sample split at the base of the mortise. LESSON: Longer tenons reduce the possibility of wood splits and strengthen the joint, reinforcing the same finding from last year's tests.
■ FINDING: In all tests, none of the tenons broke or even showed signs of cracking. LESSON: The tried-and-true rule of making tenons one-third the thickness of the workpieces still provides plenty of strength along the tenon.
■ FINDING: On some shear-test samples, the tenon pried loose the wood between the mortise and the stile end (see below), but not before splitting the stile along its length. LESSON: Use this joint where durability matters. The tenon's glue strength more than offsets this weak spot in the joint.
■ FINDING: One weak spot occurs where the end of the tenon doesn't touch the bottom of the mortise.
LESSON: Gaps meant to collect excess glue weaken the joint. Aim for wood-to-wood contact, and don't overapply glue.

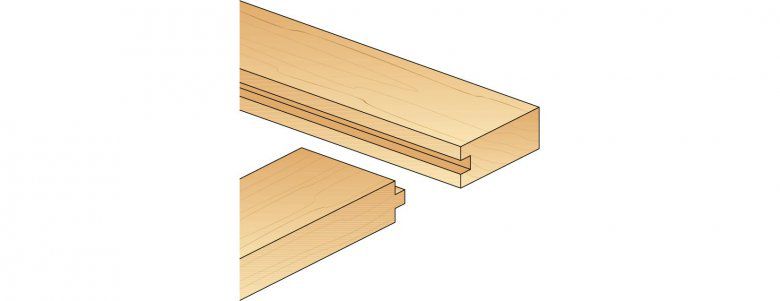
#3 Stub-tenon-and-groove
■ FINDING: Like the mortise-and-haunched-tenon joints, the stile split at the bottom of the groove during the pull-apart tests. In all tests, the 3⁄8 "-long tenons held onto the surrounding wood. LESSON: Because these tenons don't extend deeper than the groove, be sure to strengthen the joint by thoroughly gluing the tenon shoulders and ends.
■ FINDING: The ends of the tenons pulled fibers loose from the stile pieces. LESSON: Glue does a poor job of filling gaps. A tenon fitted to precise length increases joint strength and improves the frame's appearance.

#4 Cope-and-stick
■ FINDING: Despite the routed stile and rail profiles, the pull-apart and shear strengths of this joint nearly equaled stub-tenon-and-groove joints. LESSON: A profile will not weaken the joint.
■ FINDING: On each pull-apart test, the stile split at the base of the rail tenon. LESSON: The joint at near right broke in an area of curved grain. For strong frames, begin with straight-grain stock.
■ FINDING: Even with this amount of end-grain-to-edge-grain gluing surface, the joint outlasted the wood. LESSON: This joint is more than adequate for frame-and-panel construcion.


CONCLUSIONS
It's no coincidence that the two strongest joints are the ones with the most face-grain-to-face-grain glue surface area. Choose half-laps for frames holding thick glass or mirrors, especially if the frame's width exceeds its height. Mortise-and-haunched-tenons handle the same jobs, and have grooves already cut into the stiles and rails as you make the joint, not added after you cut the joint. Use these on doors you'll open frequently or that will face abuse on a daily basis.
But don't give up on stub-tenon-and-groove or cope-and-stick joints. Multiply their strength by four on an actual cabinet door—then add the reinforcement provided by the door's panel—and these two joints will survive all but the worst abuse. To increase the strength of any joint, use straight-grain stock, and make certain the gluing surfaces are smooth.

DRAWER JOINTS
#1 Box joint
■ FINDING: Glue bonds were strong enough to tear off wood fibers and parts of the fingers on both pieces in the pull-apart tests. End-grain-to-face-grain glue bonds also pulled off corners of fingers. LESSON: This joint in 1⁄2 " stock creates 33⁄4 square inches of gluing surface, about half of that in edge-grain-to-edge-grain connections. Use box joints on your projects where pull-apart strength matters most, such as utility drawers made to hold heavy objects.
■ FINDING: Although strong against pull-apart forces, the joint's shear strength was only 4 percent of its pull-apart strength. LESSON: Consider reinforcing this joint with #18×1" brads in the edges of the end fingers.


#2 Lock miter
■ FINDING: On all joint samples, the tapered tenon on one piece remained bonded with its mating dado. This joint's face-grain-to-face-grain glue area contributes to its strength. LESSON: This joint combines strength with an attractive mitered outside corner.
■ FINDING: The mitered portions of the outside and inside corners contributed little strength to the joint. LESSON: Choose a bit profile that minimizes these portions of the joint.
■ FINDING: Each joint in both types of tests failed when the tenon broke off at its base. LESSON: Because these router bits cut tenons wider at their bases than at their tips, the joint proves stronger than the lock rabbet.


#3 Lock rabbet
■ FINDING: Despite having all end-grain-to-face-grain glue-joint areas, lock-rabbet glue bonds still outlasted the surrounding wood. Joints failed when the ends of the mortised pieces cracked from edge to edge. LESSON: When using a lock-rabbet joint to connect a drawer back to the sides, increase its strength by positioning mortises away from the drawer side ends.
■ FINDING: Joint areas burned during milling showed no attached fibers after the joint was broken. LESSON: Burned joints won't absorb glue well. Use a slow bit speed to rout this joint, and sand off any burn marks left by a tablesaw.


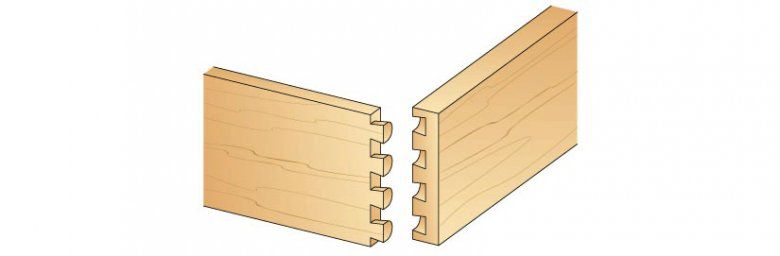
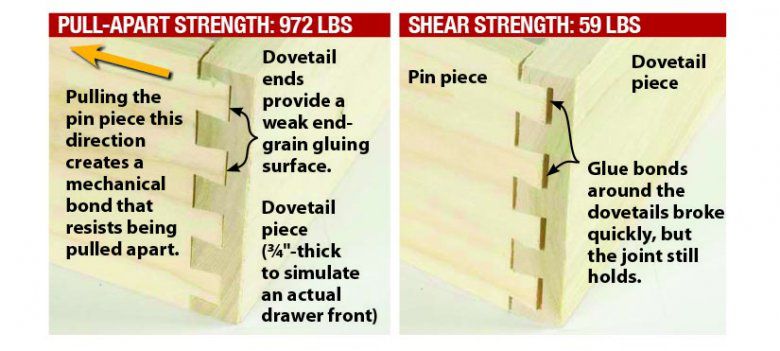
#4 Through-dovetail
■ FINDING: On the pull-apart tests, end grain on the pin pieces pulled off almost no dovetail face-grain fibers. LESSON: Thoroughly glue both the pin and dovetail sides where there's stronger face-grain-to-face-grain contact.
■ FINDING: Despite careful gluing, portions of some pins lacked dried glue along their edges. LESSON: Apply glue to both pieces to avoid forcing out too much glue during assembly.
■ FINDING: Even after the glue bonds cracked at their peak strength, the pieces mechanically locked together. LESSON: Unlike other joints, a failed glue bond doesn't equal total joint failure when you use pin pieces on the drawer front and back with dovetailed sides.


#5 Sliding dovetail
■ FINDING: All samples in both series of tests failed when the 1⁄8 "-long strip of wood between the dovetail groove and the end of that board broke off. LESSON: Consider this joint for drawers where the dovetail piece can be mounted farther from the end of the slot piece.
■ FINDING: In both the pull-apart and the shear-strength tests, this joint was weaker than the similar lock-rabbet joint that can be cut with just a tablesaw. LESSON: Consider that the pieces have to slide together, making it difficult to insert a floating drawer bottom, and you may find you're better off with lock-rabbet joints.


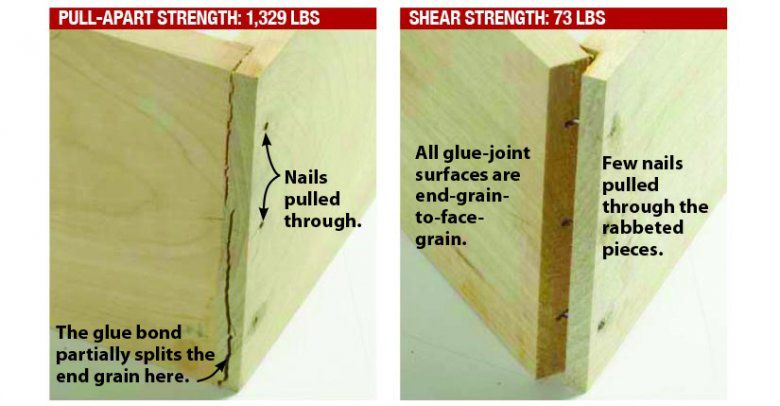
#6 Rabbet with nails
■ FINDING: Despite not having any finely machined parts, as on lock miters or sliding dovetails, the thickness of the pieces didn't translate into a stronger joint. In only one of the three pull-apart test samples did the rabbeted piece crack along its end grain, as shown below, instead of breaking the glue bond between the end grain and face grain. LESSON: Even with mechanical help from the three nails in each test sample, this face-grain-to-end-grain glue joint will fail before the wood fails, unlike most other joints.
■ FINDING: Nail heads partially or completely pulled through the rabbeted piece in the pull-apart tests; only two nails pulled through in the shear-strength test samples. LESSON: Nails may help hold a joint together during glue-up, but don't rely on them to compensate for a weak glue joint.

#7 Shouldered dado
■ FINDING: The 5⁄32 "-long strip between the end of the dadoed piece and the dado weakens this joint. LESSON: Use it for drawers where the dado can be placed away from the end of the side piece.
■ FINDING: Tenons were just 5⁄32 " thick, but none tore apart in either set of tests. LESSON: Glue bonds provide even a skinny tenon great strength.
■ FINDING: On two pull-apart tests that were stopped after cracking at peak strength, the joint still held together. LESSON: Carefully reglue end grain of the dadoed piece at the first sign of cracks, and you may still be able to salvage the joint.


#8 Half-blind dovetail
■ FINDING: Pull-apart tests quickly broke the glue joint, but the shape of the pins within the dovetail piece kept the two halves together. LESSON: You can disassemble damaged half-blind dovetails, remove the old glue, and successfully reglue the joint.
■ FINDING: On pull-apart tests, the curved backs of some pins tore apart from the stress. LESSON: Slow your router speed enough to prevent burning either the pin or the dovetail pieces. Then glue all the joint surfaces of both pieces, not just the dovetail sides.
■ FINDING: No half-dovetails along the edge of any sample cracked or broke off. LESSON: Lay out the joint so that partial dovetails at the edges measure at least half the width of the full dovetails.
■ FINDING: Joint parts remained connected well after the glue joint cracked. LESSON: Mechanical strength explains why woodworkers have made dovetail joints for centuries.
CONCLUSIONS
Choose box joints for a drawer rugged enough to be pulled out and used as a storage box or organizer. For mitered corners without visible end grain, lock miters have nearly the same strength.
Lock rabbets create an easy-to-make but strong joint for attaching drawer backs you'll inset 1" or more from the ends of the drawer sides. Machine-made through-dovetails lack shear strength, but they're one of the few repairable joints—great for heirloom furniture.
Sliding dovetails offer little strength or practicality. If your drawer bottom rides in grooves on all four sides, you'll need an alternate joint for the front or back. Nail-reinforced rabbets may not be elegant, but they're quick to make and can attach both the fronts and backs—fine for utility drawers. As for shouldered dado joints, you're better off using lock miters if you want a joint you can cut on a tablesaw. Half-blind dovetails lacked the strength of the other joints, but they're attractive, leave a smooth drawer front, and like the through-dovetails, you can reassemble them should the glue bond break.
