Wood Toning 101


Sometimes stain doesn't give you the results you want. Maybe the project you just built and finished isn't quite the same color as the furniture that it's supposed to match, or an area of light sapwood stands out, or adjacent boards within the project vary too much in color. Fortunately, there's a straightforward solution to many such color problems: It's called toner.
A toner is simply a clear finish with dye or pigment added. Most often, the finish is lacquer, but it also can be shellac, waterbase, or varnish. Those components are typically combined in an aerosol can that enables you to fine-tune your project's color like a professional.
Toner offers a couple of important advantages over stains: (1) It's easier to control the color you apply and (2) a toner goes on in a consistent layer on a sealed surface rather than soaking unevenly into the wood, adding another degree of control.
Buy it or mix it: Here's what's available
We bought lacquer-based toner in spray cans to prepare the samples you see in this article. Klingspor's Woodworking Shop carries toner in spray cans. Call 800/228-0000 to purchase a catalog.
Spray cans save a lot of time for professional furniture restorers, and they're fine for hobbyists, too. A few basic colors produce many hues when used in combination.
You also have the option of mixing your own toners. Do this by adding oil-soluble dye to lacquer; water-soluble dye to waterbase; or alcohol-soluble dye to shellac. These, too, can be purchased through catalogs or online. The dyes can be liquid or powder. If you use powder, dissolve and strain the mixture before adding it to the finish. Woodworker's Supply carries a wide range of dyes. Call 800/645-9292 for more information.
In a pinch, you might choose to make a pigment toner by adding a small amount of artist's oil—available at stores that carry craft or art supplies—or lacquer-based pigment stain to lacquer; or add water-based pigment stain to water-base. However, a pigment toner obscures the grain of the wood if you apply it too heavily. We recommend sticking with dye toners.
When you mix a toner, start with a very small amount of colorant. Test the result, and add more as needed.
Once you find the right color, apply your homemade toner by spraying. You can't get the desired results by brushing or wiping. If you don't have high-volume, low-pressure (HVLP) equipment, try the inexpensive system shown at the end of this story. It works well for small applications.
Take a subtle approach
No matter what task you tackle with toners, the basic usage rules remain the same:
* Light it up. Work in a well-lit area so you get a clear look at the colors. Also take the type of lighting into account. For example, a given color might look quite different in sunlight than under fluorescent lights.
* Use thin coats. Hold your spray applicator 12" to 15" away from the surface, and apply the toner as a light mist. Be sure to move the applicator quickly and steadily when spraying.
* Take your time. Pause often to let the toner dry, and look at the result from several angles to judge the result.
One caution: A toner that's incompatible with the underlying finish can result in cracks or crazing. If you have any doubts, apply a barrier coat of shellac before toning.
Learn to judge color
The biggest challenge in toning, of course, is to arrive at the right color. Practice will help you develop your eye, but don't worry: Most woodworking projects stick close to the basic earth tones. When in doubt, start with a light color, and gradually move toward a darker one if needed. It's easy to darken a finish, but almost impossible to lighten it without sanding or stripping it away and starting over.
Furthermore, it's easy to preview the effect of a toner before spraying it on your project. As shown in the photo below, sample slides are available that let you see how various toners would alter the color. This allows you to buy exactly what you need for a project. However, you can test a shop-made toner with nothing more than a small pane of glass. It's a simple technique that we'll use as we set out to match an unfinished item to a finished one.

Three ways toner can improve your projects
1. Change overall color
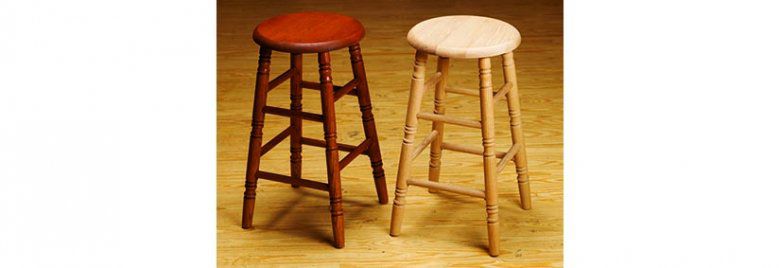
BEFORE
Toners reign supreme when you want to match pieces, such as these stools. If you don't have a stain of the exact color needed, find one that provides the right base color, and then turn to toners.
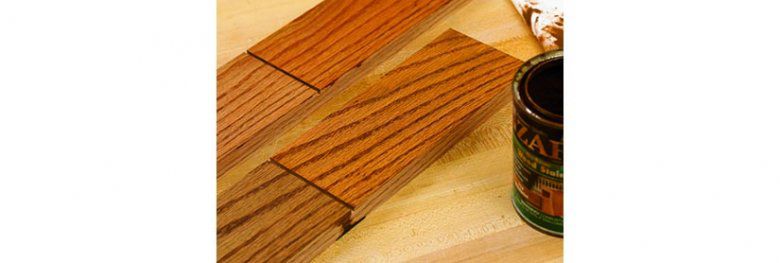
THE SOLUTION—STEP ONE
Test several basic earth-tone stains on scrap that resembles the piece you plan to stain. Look for yellow or red tones in the stained piece to guide you. With practice, you'll learn to pick out the right background color.

STEP TWO
To test shop-made toner, spray it on glass, and then place the glass on the surface to be toned. Note: Here's your starting point when you simply want to adjust the color of a piece without regard to matching.
Toner gives you a quick way to tweak the color of a finished project until it suits you perfectly. Or, when you want to match a new project to existing pieces, toning can save the day.
As you see in the BEFORE photo above, we needed to match a finished stool that's made of red oak and has a reddish tone. First, as shown in the STEP ONE photo above, we tested some common oil-based stains on red-oak scrap. We chose the one that seemed to best match the background color of our finished stool, and then applied it to the unfinished piece. After the stain dried, we sealed the surface with shellac sprayed from an aerosol can. This step ensured that the toner would go on as a separate, transparent layer rather than being absorbed into the stain and wood. This helps keep the process simple and manageable.
Next, we sprayed several shades of toner on glass, laying down a light mist of one toner per pane. Then, we placed one pane at a time on the newly stained surface. When we tried the amber sample, shown in the STEP TWO photo above, we saw the color we wanted. Of course, you might need more than one toner color to reach your goal.
For the next step, we simply sprayed toner on the stool in very light coats until the two pieces of furniture matched, as shown in the photo below. After toning, spray on a clear topcoat for protection against wear.

AFTER—PIECES PERFECTLY MATCHED
Apply light mist coats of your chosen toner, as shown in the opening photo. Let each coat dry, and check the results from different angles. Eventually, you'll come up with a perfect match like this one.
2. Blend mismatches

BEFORE
Stain often fails to even out the differences between boards of different color, and can even emphasize them. The same thing happens if you opt for only a clear topcoat. Again, spray samples on glass to decide which toner or toners will do the trick.

THE SOLUTION
Seal a stained surface with a clear finish, and then mask off the areas that don't need color, either with tape or by holding a piece of cardboard where needed. Check your progress frequently by moving the cardboard or lifting the tape.


AFTER—SAPWOOD SUCCESSFULLY BLENDED
Two toner colors—honey maple followed by medium red mahogany—combined to give the sapwood streak a warm cherry hue in this panel. With the sapwood blended in, we sprayed a mist coat of honey maple over the entire tabletop to even out the overall appearance.
After you stain or topcoat a project, it's disappointing to see significant variations in color. Sometimes, boards just don't match, or an area of sapwood stands out like a beacon. Solve either problem by using toner on light areas to blend them with darker ones. This process is often referred to as blending.
We made a small tabletop with cherry boards, placing a significant area of sapwood along one joint. These photos show the problem, and how we solved it. If you use this method on cherry, place the wood in direct sunlight for a couple of days to let it darken, and then match that color.
Remove the masking material before you're done toning. Feather the toner into the rest of the surface as you make your final passes, rather than building a distinct ridge of finish. When you're satisfied with the color, stop and let the toner dry. Then, you might choose to add a light coat of toner over the entire piece to make the overall appearance as uniform as possible.
In most cases, you'll want to spray on a clear topcoat after the toner dries. Spraying instead of brushing avoids disturbing the toner coat, which becomes a problem if you apply lacquer on top of lacquer toner, or shellac on top of shellac toner. A good topcoat allows you to rub the finish without going through the toner.
3. Shade for effect
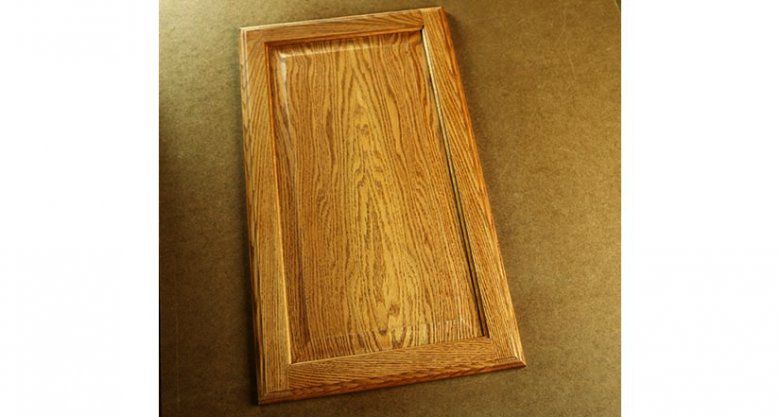
BEFORE
This raised-panel red-oak cabinet door has an ordinary appearance after a coat of stain. We decided to shade the beveled edges of the panel for the illusion of greater depth.

THE SOLUTION
As you're learning to shade, it's best to mask around the area you want to color. Choose a toner that complements the existing stain, but darkens it noticeably.

AFTER—DECORATIVE DEPTH ADDED
Shading produced a distinct contrast between the toned and untoned surfaces. The raised panel now seems to stand out visually much more than it did before.
When you spray toner onto selected areas of a project to increase color variation, it's called shading. Create an antique look by adding dark color to spots that normally accumulate dirt and wax, or emphasize the difference between high and low spots. These three photos show how we emphasized depth on a raised-panel door.
Try the do-it-yourself approach to spraying toner
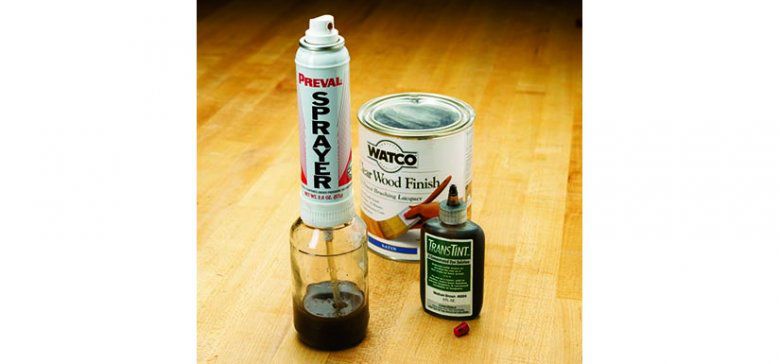
Many home centers and hardware stores carry a handy, very affordable product that's well suited to toning. The Preval spray system, made by the Precision Valve Corporation, consists of a pressurized sprayer unit and a detachable glass jar. We bought the system at a home center.
To use it, simply change from one jar to another to spray different toners, and replace the spray canister when it loses its pressure. Each canister will spray approximately 16 ounces of liquid. Make sure to clean the unit by spraying a small amount of the appropriate solvent after each use, or it will clog.