Make Cabinets the Easy Way

Okay, let's hear 'em—your excuses for not making those cabinets you could use everywhere from your kitchen to your workshop: "Oooh, they have doors." Relax. You can make doors using just your tablesaw and a general-purpose blade to cut the joints.
"But…but, they have drawers!" Imagine making a simple box without a top, and you're picturing most of the skills needed to make these drawers using only a tablesaw. You'll mount those boxes with simple glides that nearly install themselves and adjust to clean up minor installation errors. Then mount the drawer fronts to the boxes for dead-on alignments. No sweat.
"Umm, I have to go to the bathroom." Then take some measurements for a new bath vanity while you're in there, and catch up with us on the next page.
Begin with the right cabinet dimensions
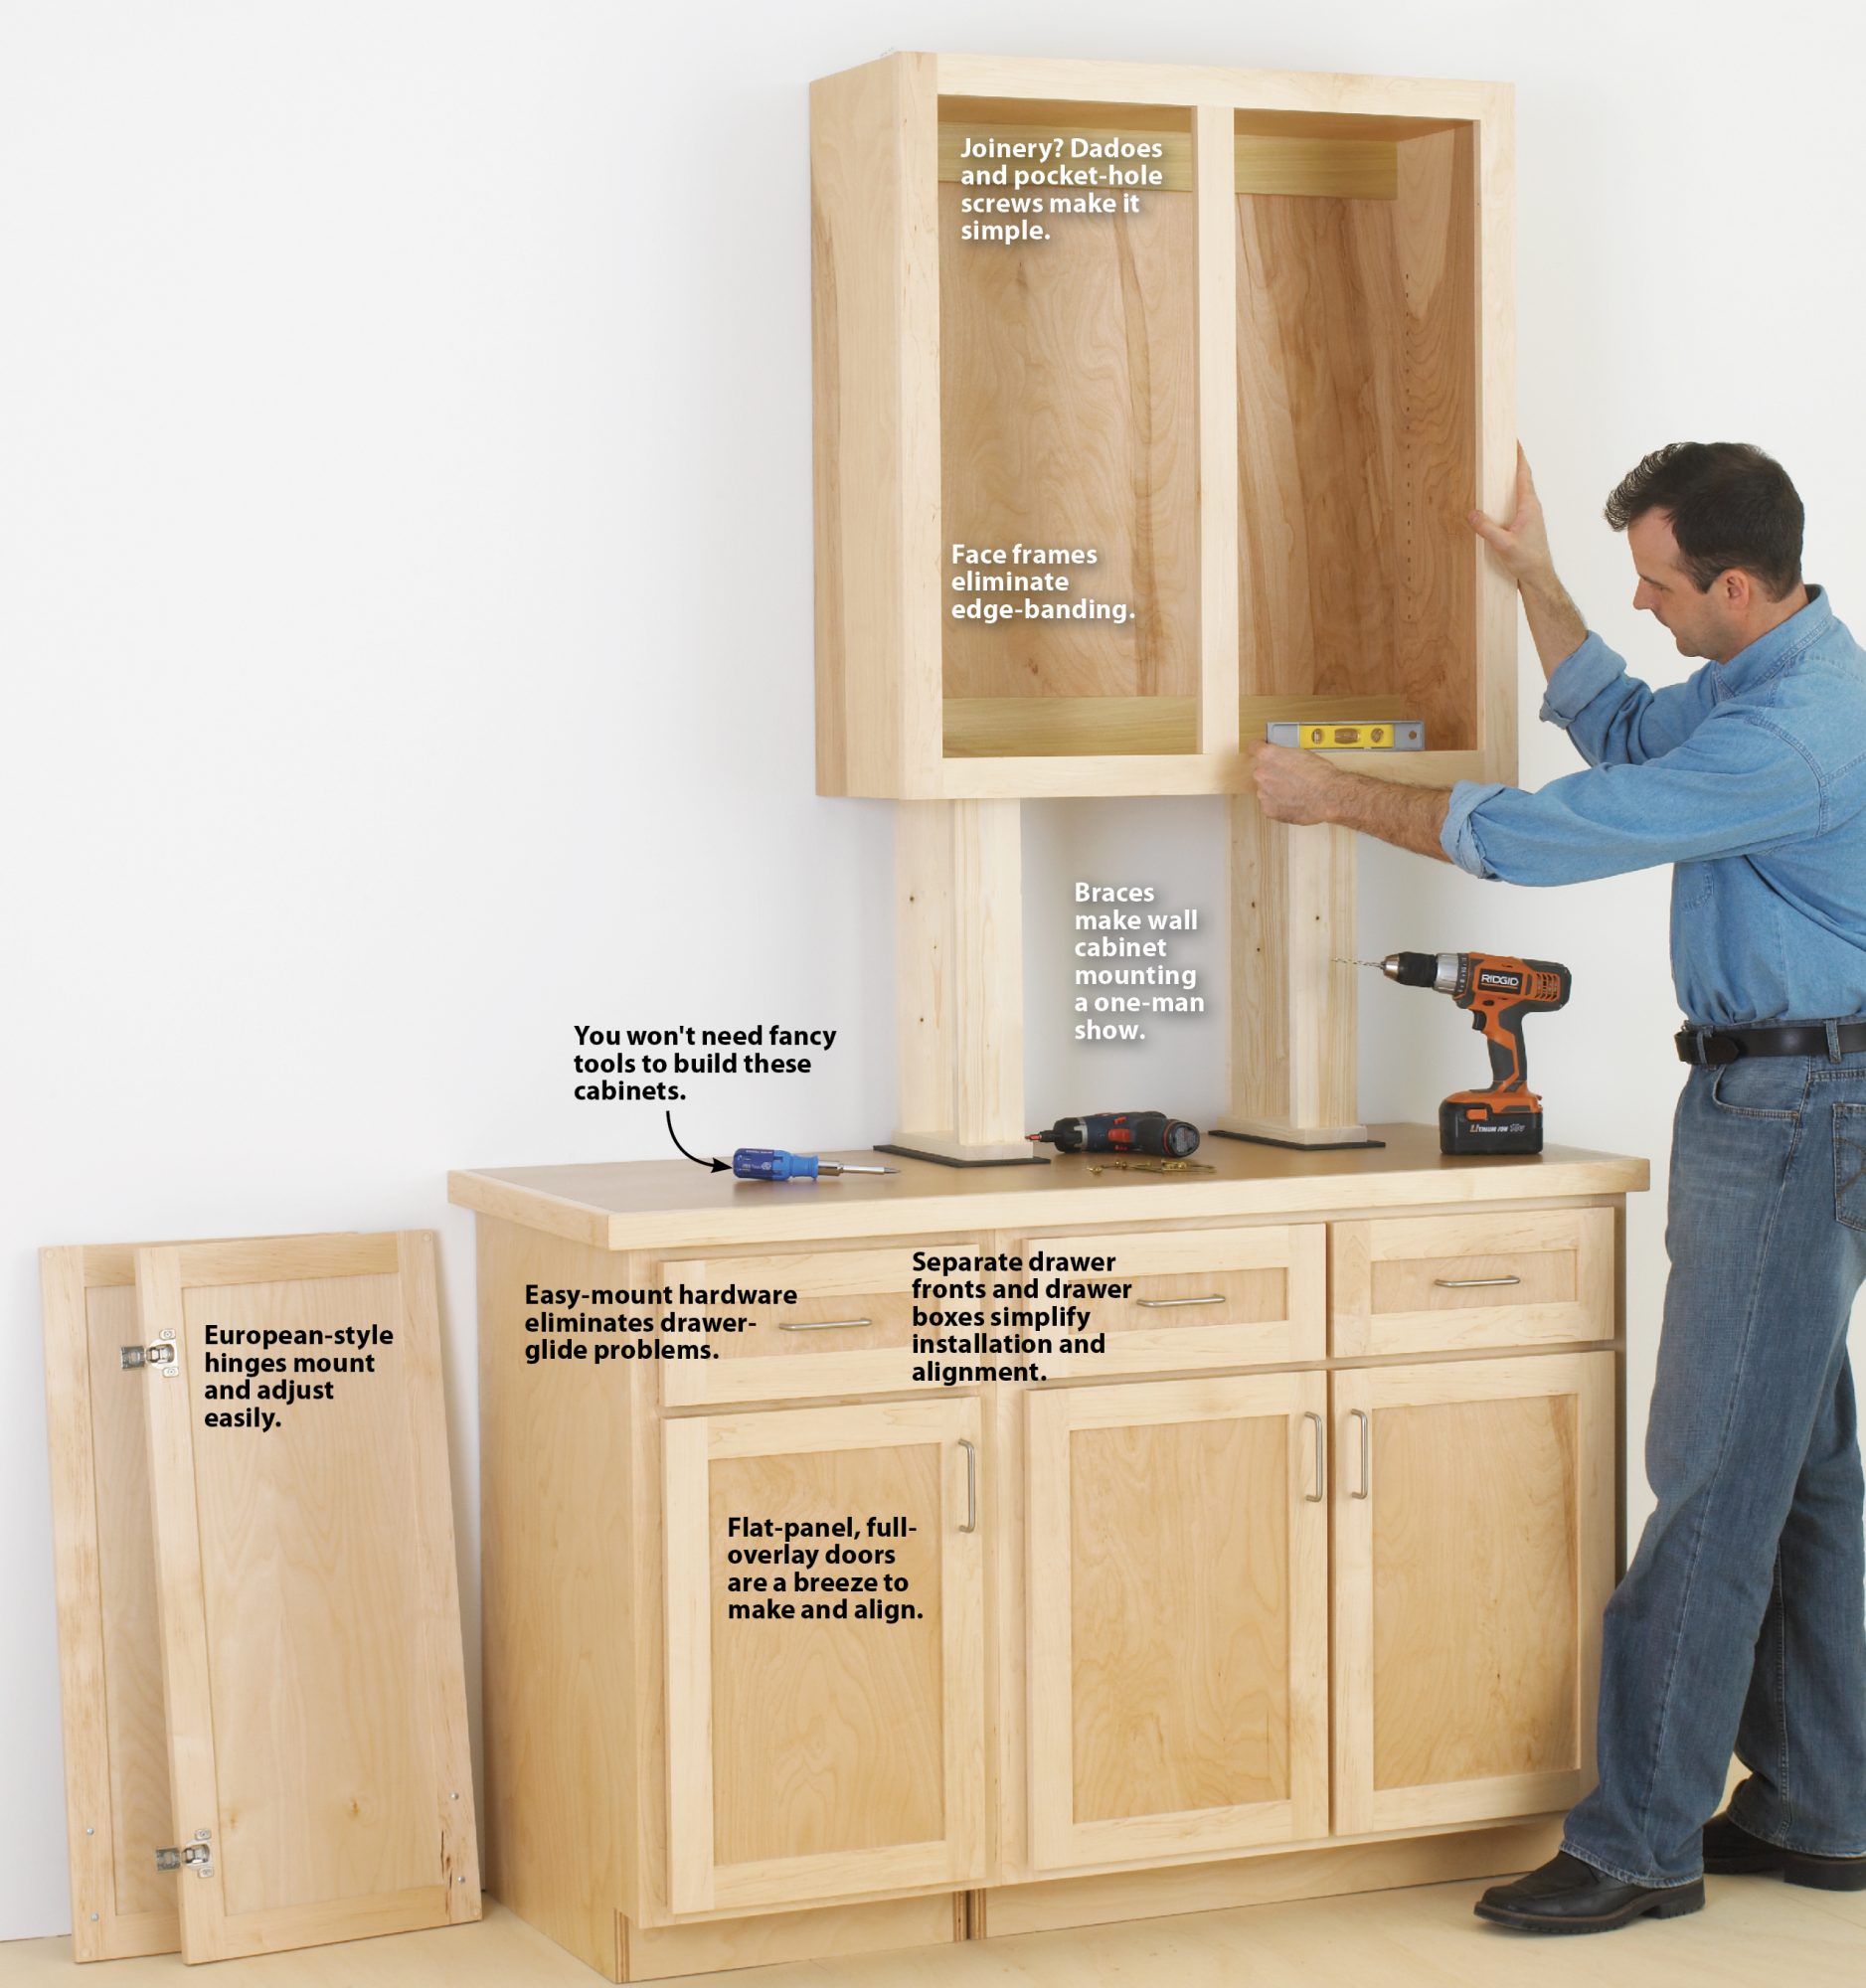
The sample base and wall cabinets shown below have these features to make building them as simple as possible:
- The 3⁄4 " plywood case eliminates panel jointing, planing, and glue-ups.
- Face frames cover plywood edges. Overlaps on the sides let you fine-tune the cabinet width during installation.
- Plywood-panel doors and drawer fronts require no routed profiles.
- The drawer slides we recommend provide lots of mounting flexibility and the chance to undo minor mistakes.

A word about materials
Learn why it pays to buy good plywood.
The cabinet cases shown here were made from birch-veneer, medium-density fiberboard (MDF)-core plywood for economy. You can instead use hardwood-veneer plywood, solid MDF, plain or melamine-covered particleboard, and solid wood. Double-check the material thickness before calculating cabinet sizes and cutting dadoes and rabbets.
Build the face frame from solid wood to match or contrast with the sides. Choose clear, straight-grained wood, and assemble the frame soon after machining to reduce warping.
Standards help you design
Over the years, cabinetmakers have standardized some cabinet dimensions based on practical considerations, such as the average height of people. You needn't adhere strictly to these, but vary them at your own risk of discomfort.
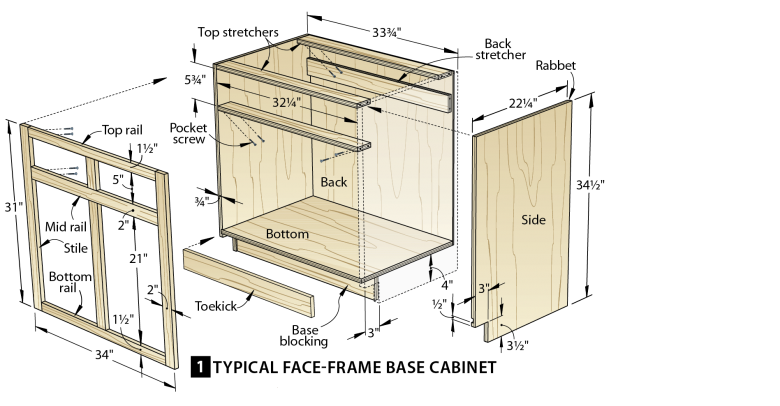
- Standard base cabinets measure 341⁄2 " high, for a 36"-high work surface with a 11⁄2 " countertop.
- At 24" deep, standard base cabinets allow you to bend over and reach in to retrieve anything at the back.
- Make cabinets as wide as you like, but remember that the wider the doors, the greater the tendency to rack and warp. Also, the wider the door, the more clearance you'll need in front of the cabinet.
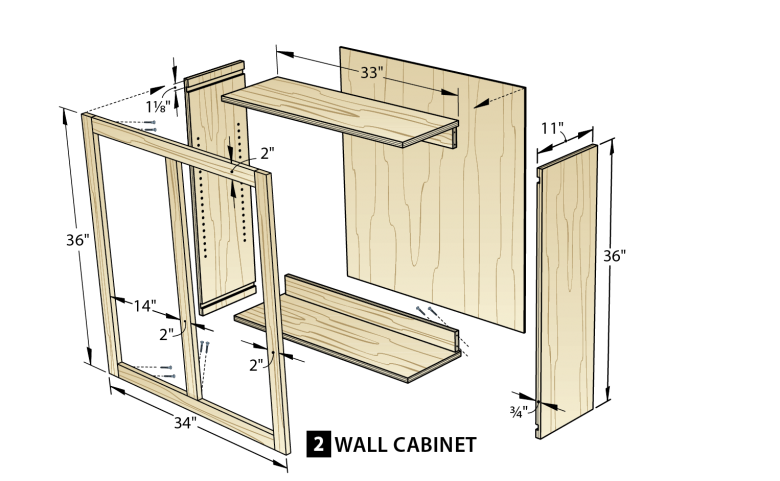
- Standard wall cabinets measure 12" deep. Deeper cabinets hinder access to the countertop below.
- Wall cabinets commonly mount 18" above the base-cabinet countertop.
Fit the case to an opening
Want to learn more about built-in cabinet installation? Here are the techniques for making them blend into a room.
To allow built-in cabinets a margin for unsquare walls, design the case 1⁄2 " narrower than the opening between another cabinet and a wall or between two walls. You'll fill the gap with the face frame overlap on the sides.
To calculate part sizes for a base cabinet that's wider or narrower than the one above, follow this formula:
- Multiply the thickness of the plywood or MDF sides times two.
- Subtract 3⁄4 " to allow for two 3⁄8 "-deep dadoes joining the bottom to the sides.
- Subtract that number from the case width.
Cut the cabinet bottom to that length. For example, to make a cabinet 333⁄4 " wide using 3⁄4 " plywood, cut the case bottom 33" long. To size the stretchers, use that same number minus the 3⁄4 " dado allowance. Calculate upper cabinet sizes the same way.
Make a no-fuss case using your tablesaw
For a base cabinet less than 4' wide, you can cut all the parts except the back and toekick from one 3⁄4 "×4'×8' sheet of plywood or MDF. Plywood thicknesses vary, though, so make certain your material thickness measures a true 3⁄4 ", or adjust your part dimensions to achieve the final cabinet width.
Start by ripping two side pieces to the cabinet depth (minus the frame thickness); then cut them to length. Label them left and right with pencil marks on the inside faces. Now subtract the thickness of the back from your fence setting, and cut the bottom panel to width. Then cut the bottom to length.
Read our foolproof trick for perfect-fitting dadoes on the tablesaw.
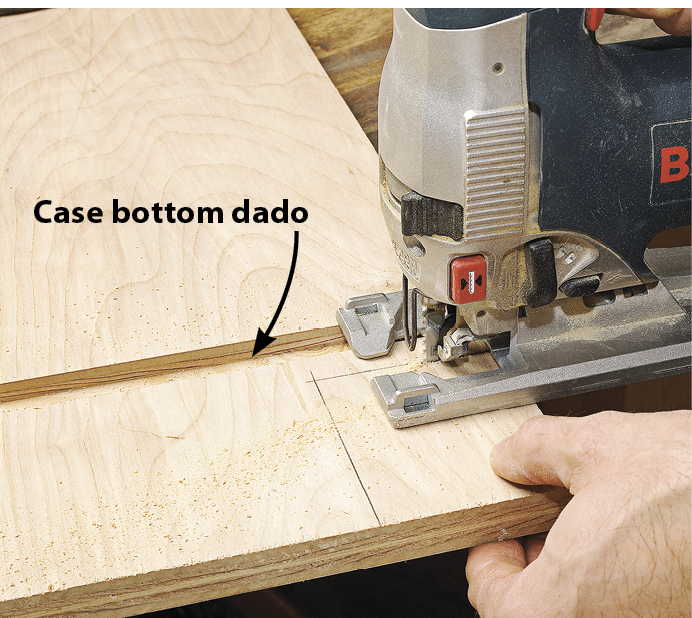
Using the plywood thickness to set the stacked dado width, cut a 3⁄8 "-deep dado on the inside face of each side piece to accept the bottom. You can use the same setup to cut 3⁄8 "-deep rabbets along the inside back edge of the sides to accept the cabinet back. Then notch the bottom front corner of both side pieces for the toe kick [below]. A toe kick allows you to stand closer to a cabinet without bumping the front with your feet.
Now cut four 21⁄2 "-wide stretchers and a 31⁄2 "-wide base block. Drill two pocket holes on both ends of each part. If you'll add an adjustable shelf within the case, lay out and drill shelf pin holes on both sides. For even spacing, make a template from a piece of perforated hardboard as a drilling guide. Click here to watch a free video on how to drill shelf pin holes.
Putting it all together
Find plans for a dead-flat, torsion-box assembly table here.
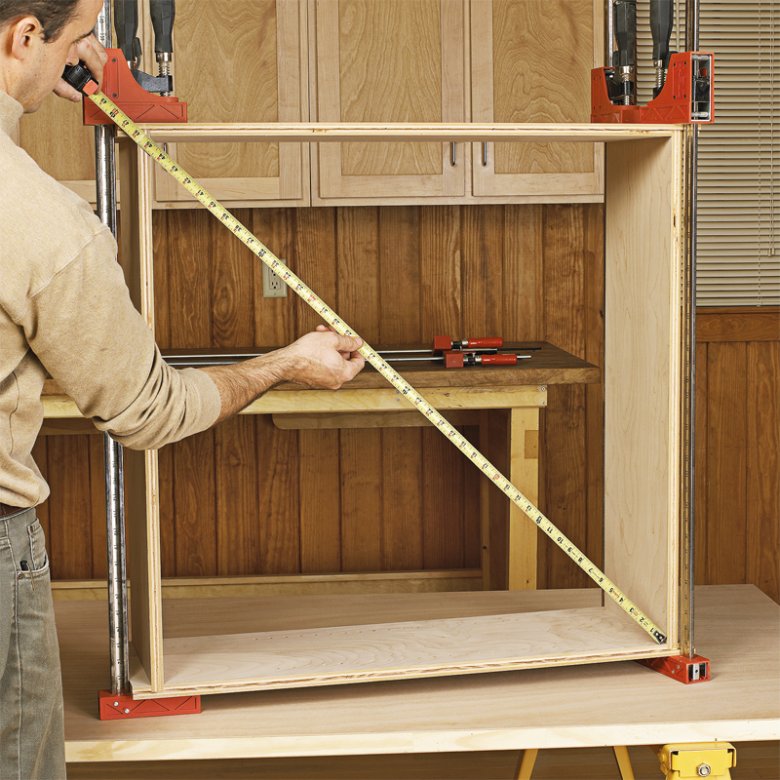
A dead-square cabinet requires a dead-flat assembly surface to avoid twisting the glue-up. First lay a side panel on your work surface with its dadoed face up. Apply glue to the dado and insert the bottom. Then glue the dado on the other side panel dado and mount it on the bottom. Support the other end of the side panel with top stretchers that you'll pocket-hole-screw in place.
To calculate the front drawer stretcher position, add 1" to the height of the drawer boxes you'll make. Then cut two stretchers that length to space the front drawer stretcher that distance from the front top stretcher and pocket-hole-screw the drawer stretcher in place [below].

Measure and center the back drawer stretcher flush with the bottom of the front drawer stretcher. Check for square, as with the upper cabinet [below]. After the glue dries, cut the back to fit. Then glue and nail it in place.
Pocket holes simplify face-frame assembly
You can join face frame parts using everything from dowels to half-laps to mortise-and-tenon joints, but we like pocket-hole joinery. Here's why:
- Machined or hand-cut joints may display your skill, but they'll take longer to make than the case itself.
- They eliminate gluing and clamping.
- Though weaker than some cut joints, pocket-hole joints gain strength after you mount the frame on a case.
Cut frame parts from straight-grain 3⁄4 "-thick stock 11⁄2 " or 2" wide, depending on the part. Why those sizes? Frame parts narrower than 11⁄2 " don't mount easily to the case, while parts much wider than 2" interfere with access to the cabinet.
Cut your face frame parts
Begin by cutting 2"-wide stiles 1⁄8 " longer than the dimension from the toe kick cutout to the top of the case (31" in this case). If you need to allow for uneven walls, make the stiles 21⁄4 " wide, and later trim the overhangs on the sides to fit the opening. You'll also cut the middle rail beneath the drawers 2" wide.
From 11⁄2 "-wide stock, cut the top and bottom rails. To calculate the length of all three rails, measure the case width and add 1⁄4 " for the two 1⁄8 " overhangs. From that number, subtract twice the stile width for the rail lengths. Rout a 1⁄8 " round-over on the top inside edge of the bottom rail.
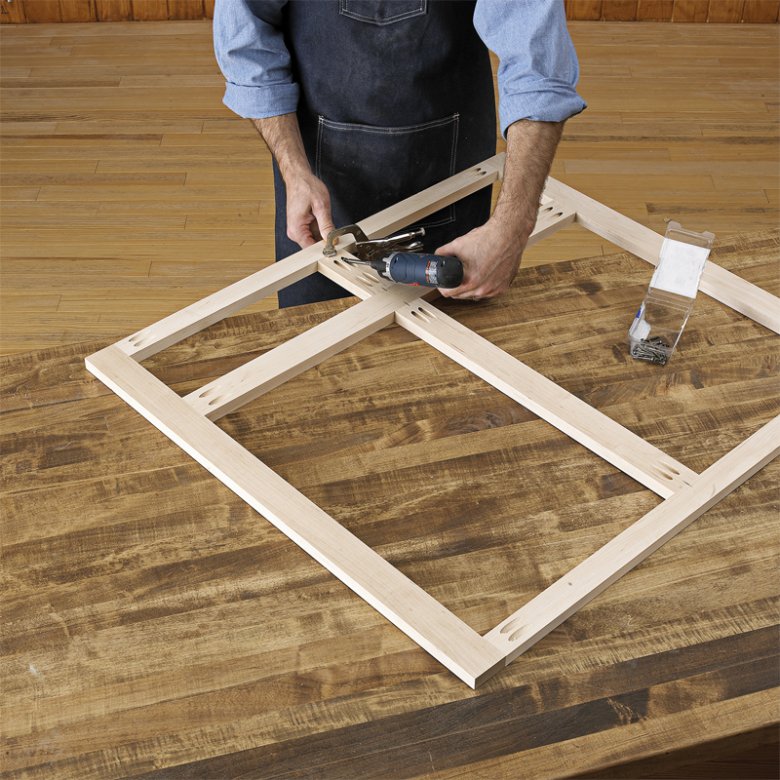
Position the middle rail so its top edge is flush with the upper face of the middle stretcher. Cut the upper and lower vertical dividers to fit between the middle rail and the top and bottom rails. Using two pocket-hole screws at each joint, assemble the frame [below]. The screws won't show after you glue the frame to the cabinet.
Glue the frame to the case
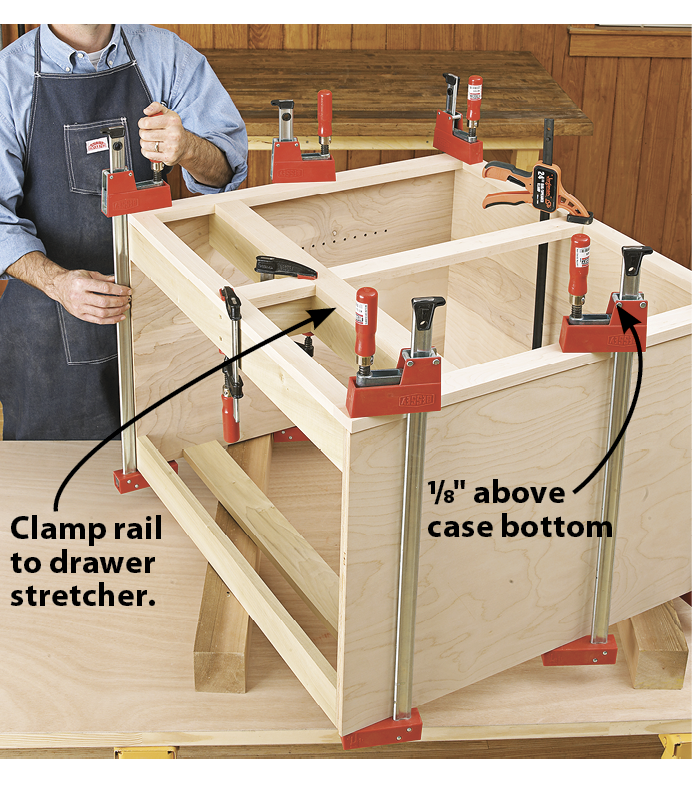
Apply glue to the case edges; then center the frame between the case sides with the lower frame rail inside edge 1⁄8 " above the inside face of the case bottom. Check that the top stile ends sit flush with the top ends of the case sides. Clamp the frame in place, including the middle rail to the drawer stretcher [below]. If you'll paint the cabinet, save clamping time by gluing and nailing the frame to the case. Then fill the holes.

Make these doable doors on your tablesaw
If you have put off learning to make cabinet doors, these easy-to-cut stub-tenon-and-groove joints will help you overcome your door horror. Divide the job into these six simple steps.
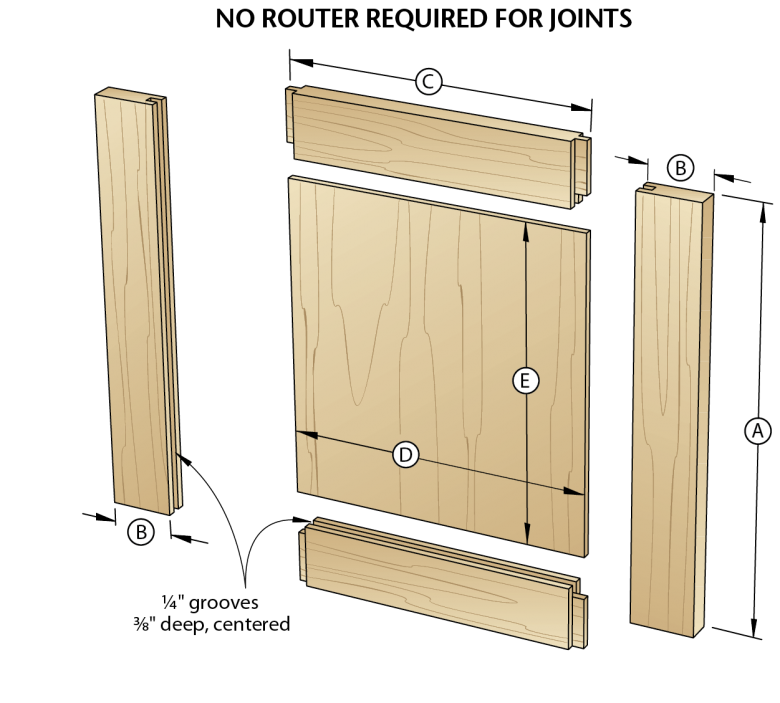
1) From 3⁄4 × 2" blanks, cut two stiles to the door height (A) [drawing above].
2) From the overall width of your door, subtract 4" for the two 2"-wide stiles (B), add 3⁄4 " for the tenons, and cut the rails to that length (C).
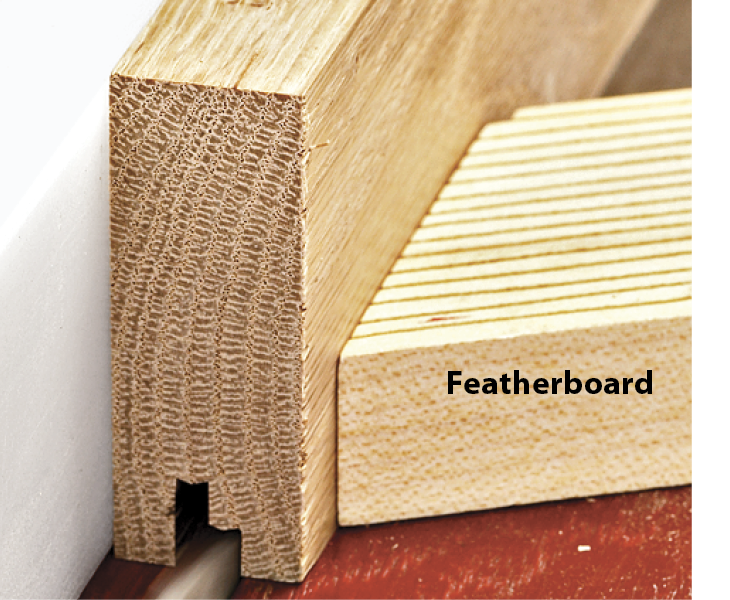
3) Set your tablesaw blade height to 3⁄8 " and position the fence to center a test piece on edge over the blade. Then cut a groove the length of the scrap. To ensure the groove is centered, turn the scrap end for end, and make a second cut [below]. Gradually move the fence away from the blade until you've cut a centered groove to match the plywood panel thickness. Cut grooves in both stiles and rails.
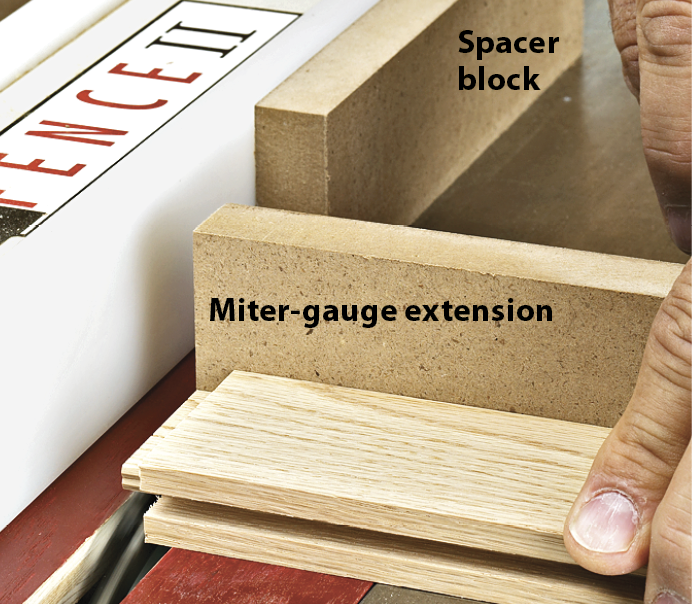
4) A dado blade speeds cutting tenons on the rails, but multiple passes with a general-purpose blade will do just as well. Set the blade height to 1⁄4 ", then double-face-tape an extension to your miter gauge and a spacer block to the fence about 4" back from the blade [below]. Adjust the fence until you cut a 3⁄8 " tenon on test scrap that just bottoms out in the stile grooves.
5) Cut the panel width (A) and length (E) a hair smaller than the space between the stile and rail groove bottoms. If you'll stain the doors, stain the panels before assembling the frame.
6) Apply glue to the tenons plus a dab centered in each frame part groove to keep the panel from rattling. Assemble and clamp the frame and panel, measuring between diagonal corners to check for square.
Now mount the doors on your cabinet
Learn about 4 types of hinge installation for face-frame cabinets.
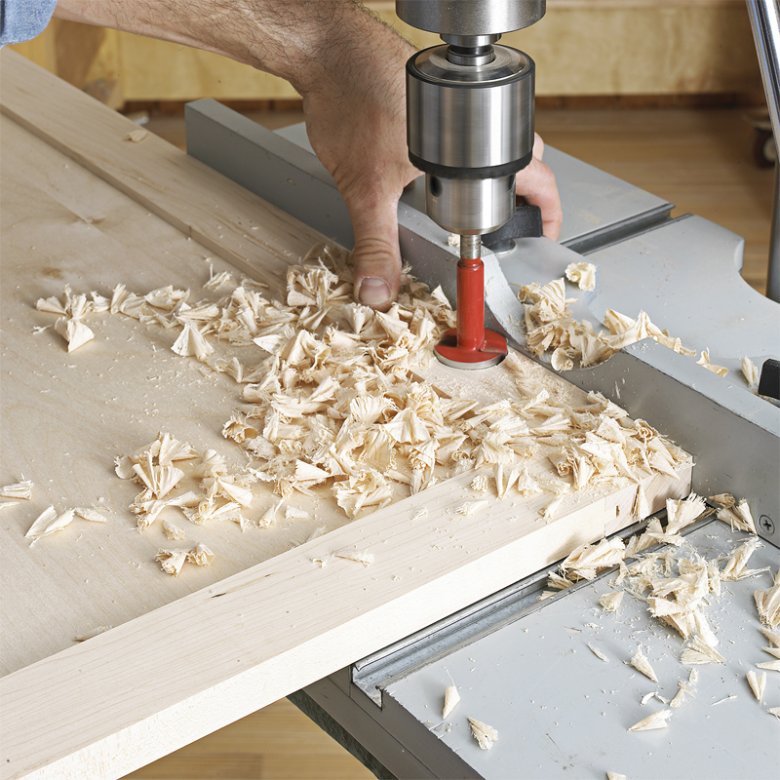
Thanks to their adjustability, European-style hinges make mounting doors as easy as assembling them. Begin by drilling 13⁄8 " holes 1⁄2 " deep with a Forstner bit [below]. (European-style hinges require 35mm holes, but a 13⁄8 " bit is close enough.) We positioned the holes 41⁄4 " from the top and bottom of the door for plenty of clearance, with the center of the hole 13⁄16 " from the stile edge.
Place a hinge cup in a hole with the straight hinge edge parallel to the stile edge [below], and mark the center of the mounting screw slots. Then drill screw pilot holes and install the hinge. Repeat for the other hinge.
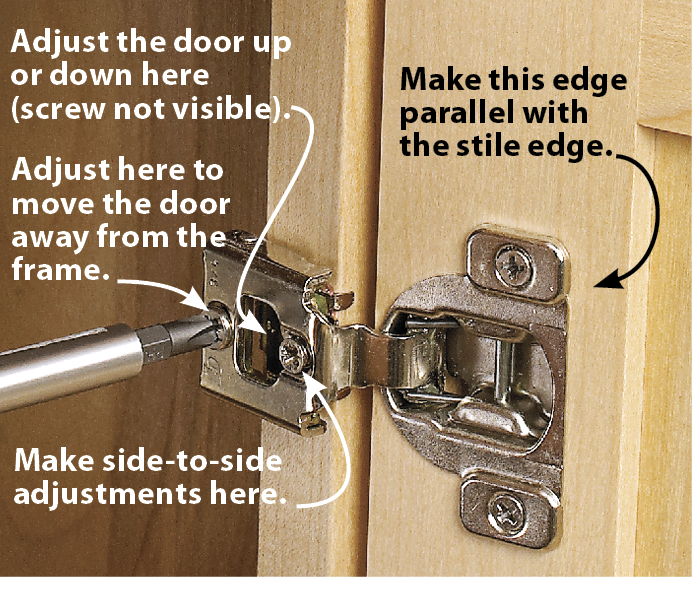
Hold the door in position centered vertically in the opening, and mark each hinge screw mounting location (at the center of each oblong hinge screw hole) along the frame edge. Drill pilot holes and screw the door to the frame. Refer to the hinge instructions for details on adjusting the door position.
How to take the horrors out of drawers
Imagine all the potential pitfalls about making drawers. Then imagine they don't exist—because for this drawer, they don't:
- No router bits required. Cut both halves of the joint on your tablesaw.
- No fussy alignments. The false drawer front aligns separately from the box.
- No tricky drawer-glide installations. The hardware we recommend allows many ways to fine-tune the position.
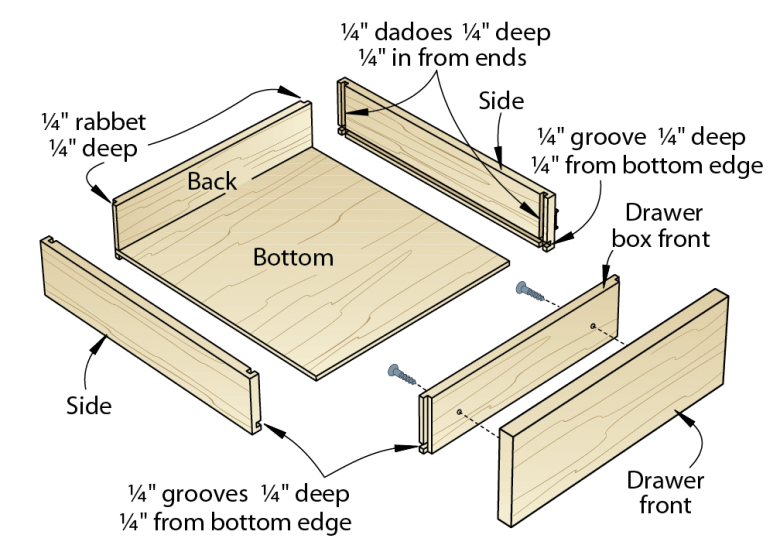
From 1⁄2 ×4" blanks, cut the sides to the drawer-box length—18" for the cabinet shown in the drawing at the top of this article. Then subtract 1" from the drawer opening width in the frame, and cut the front and back to that size (1211⁄16 " for this example).
On the bottom inside edge of each piece, cut a groove 1⁄4 " from the edge to accept the drawer bottom. (Our drawer bottom sheets measured 1⁄4 " thick.)
Set your tablesaw fence 1⁄4 " from the edge of a 1⁄4 " dado blade set 1⁄4 " high, as shown in Step 1 below. Test the saw settings in scrap; then cut dadoes at both ends of the two sides.
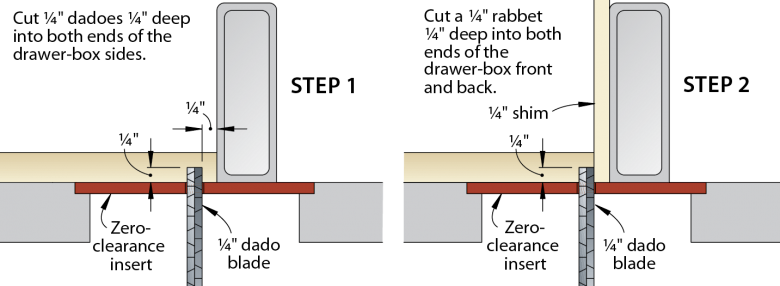
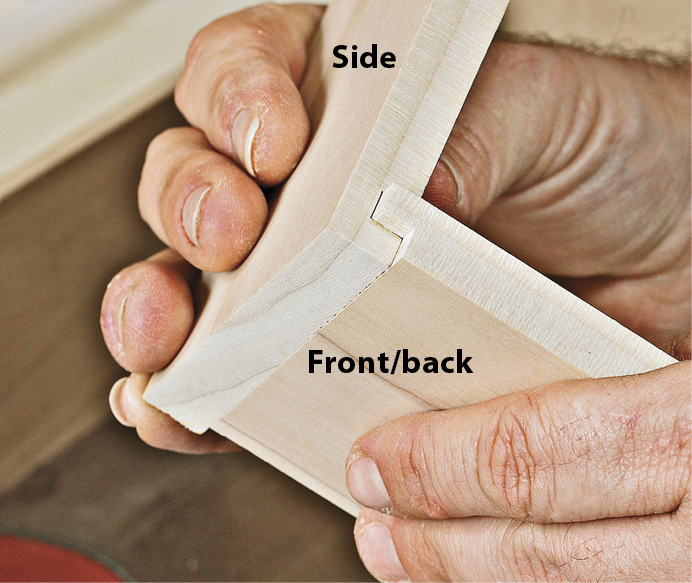
Attach a 1⁄4 " spacer to the rip fence, as shown in Step 2 above. It should just touch the teeth of the blade. Next, rabbet both ends of the drawer front and back to create a tenon that fits the side dadoes [below]. Tenons should fit dadoes snugly, with the outside faces of the front and back flush with the ends of the sides. Glue each tenon, assemble and clamp the drawer, and then check for square.
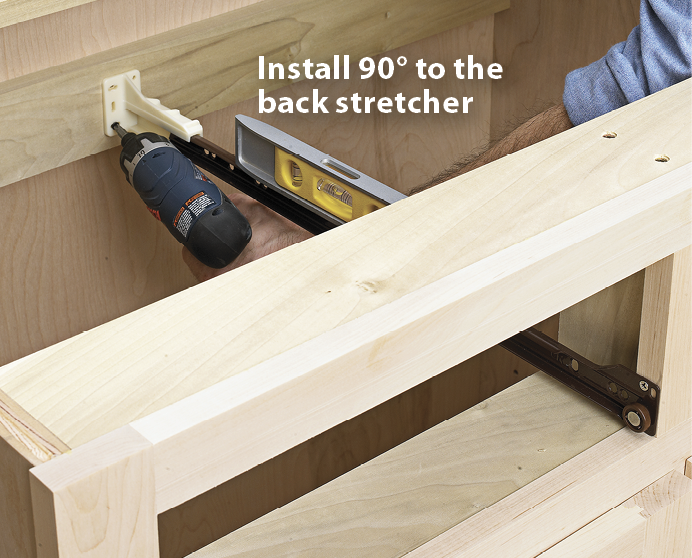
Assemble a frame-and-panel drawer front as you would a small version of a cabinet door. Then mount the glides [below] on the case and on the lower edge of the drawer box side according to the product instructions. The plastic mounting bracket lets you adjust these slides up and down and side-to-side for smooth-opening drawers. Make the front of the drawer box flush with the frame.
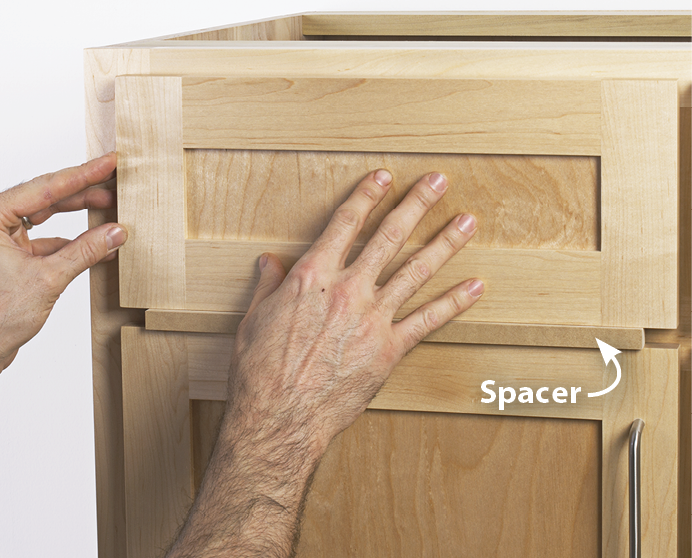
With the doors installed and aligned with each other, lay a spacer the width of the space between the doors and drawer fronts atop the door [below]. Apply double-faced tape to the inside face of the drawer front, align it with the door, and press it against the drawer box. Then drill pilot holes from the inside front of the drawer box to the drawer front frame, and screw on the front.
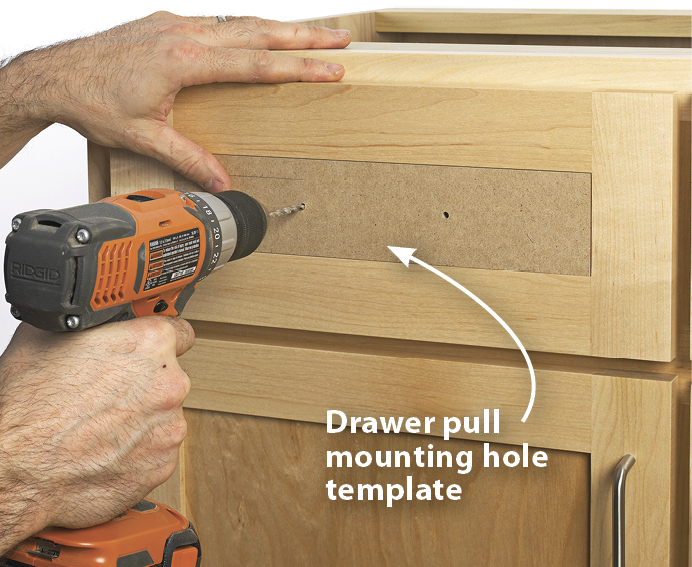
Make a template the size of the exposed panel on the drawer front, and center two mounting holes to suit your hardware. Place the template on the drawer front panel [below], and drill the hardware mounting holes. Then install the drawer pulls. Use longer screws as needed for your hardware.
Put your finished cabinets to work
Remove the doors, drawers, and all hardware, and apply a finish. Move the cases into position where they'll be installed. Shim the bottom edges to level the cabinets and make the face frame edges parallel with each other.
Learn about the specialty tools that make cabinetmaking a breeze.
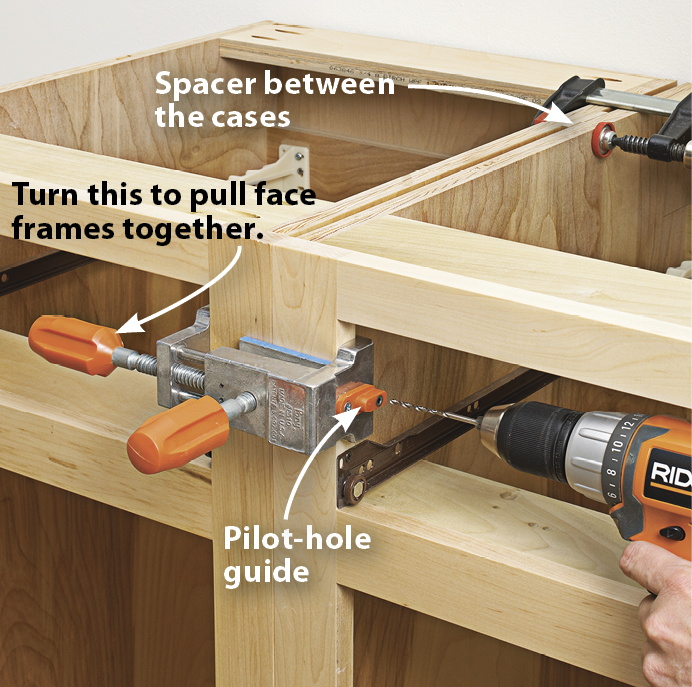
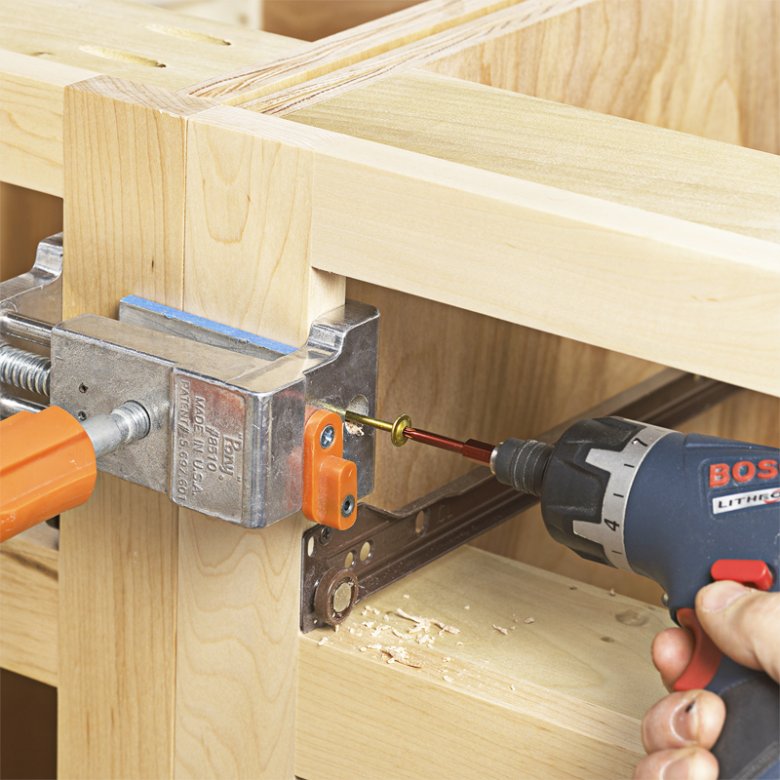
Clamp the cabinet face frames together while you screw them to the wall and each other, ensuring the faces are flush. To compensate for the frame overlap, add a 1⁄4 " spacer between the cases toward their backs and between the clamps [first photo below]. Then drill pilot holes and screw the frames together [second photo below] and the cabinets where you inserted the 1⁄4 " spacers.
Next you'll need a countertop sized to overlap the front or both the front and sides about 11⁄2 –2". We made ours from two sheets of MDF edged with maple—a practical choice for shop use. In a kitchen or bath, though, countertop options include a butcherblock, plastic laminate, solid-surface, granite, and tile.
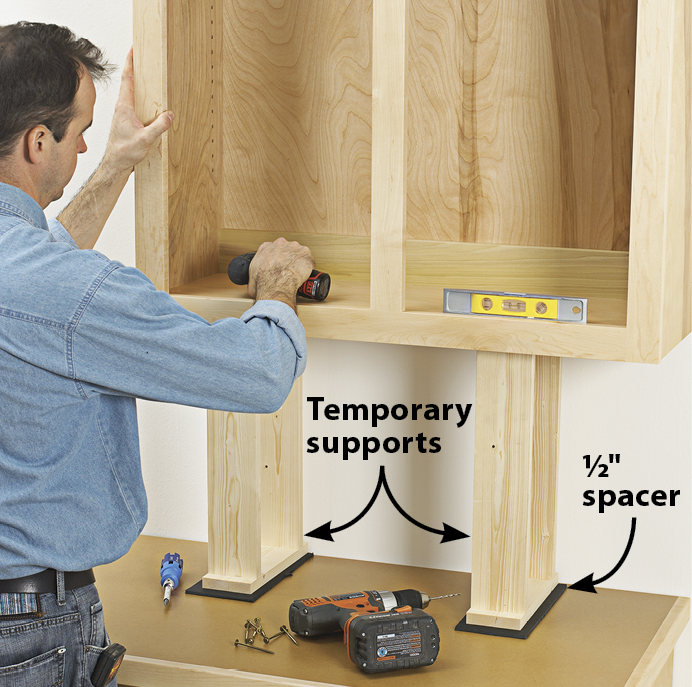
To hold the upper cabinet in place while you screw it to the wall, make two 18"-tall temporary supports from scrap. Place them on 1⁄2 " spacers, and rest the upper cabinet on the supports [below]. After you screw the cabinet in place, slide out the 1⁄2 " spacers to allow enough room for the temporary supports to tilt out from under the cabinet.
Remount the doors and drawers, fill up your new cabinets, and start scouting other locations in your shop, garage, kitchen, or bathroom for new cabinet-making opportunities.
Sources
Drawer glides: Blum 20" three-quarter extension glides no. B230M, $3.86 per pair. Rear drawer glide mounting bracket no. B0602300, $3.10 for two, Woodworker's Hardware, 800-383-0130 wwhardware.com.
Hinges: Compact 38N Screw-On no. B038N355C.12 (2) for 3⁄4 " face frames, $2 each, Woodworker's Hardware.